Meta Audience Network
Suitable for any mobile app & game, with competitive eCPM for most ad types.
Due to its broad reach, it's useful for global releases on the app stores.
For Meta Audience Network, you can use either Appodeal Default Account or you can connect your Meta Audience Network Account to Appodeal. You can read more about Network Accounts here.
Appodeal Default Account:
- You need to fulfill the requirements, which you can find in your App Settings -> Mediation Settings -> Line Items in your Appodeal account and for each app request Appodeal Meta Audience Network account connection if possible. You can also request a connection using Appodeal Default Account Connection (Admob or Meta) ticket type.
Your Meta Audience Network Account:
- Complete the steps below to link your Meta Audience Network account.
-
Make sure you have a personal Meta account.
-
You should be able to provide full details for the payout account that Meta Audience Network will pay to.
Also, check your application:
-
Make sure you use Appodeal SDK 2.10.3+/Appodeal Unity plugin 2.14.5+.
-
Make sure BidMachine is enabled in Mediation Settings.
-
Make sure you have a BidMachine Adapter in your project. BidMachine Adapter is included in the Appodeal SDK by default, make sure you haven't removed it from the project.
If Meta Audience Network ad units have already been linked with Appodeal, use this guide.
Step 1. Prepare Meta developer account
If you already have a Meta developer account, skip this step.
Go to the main page and press Log in.
Fill in your personal information and create a Meta account. After this, you can log in and continue linking your Meta account to Appodeal.
Step 2. Create a new Meta app
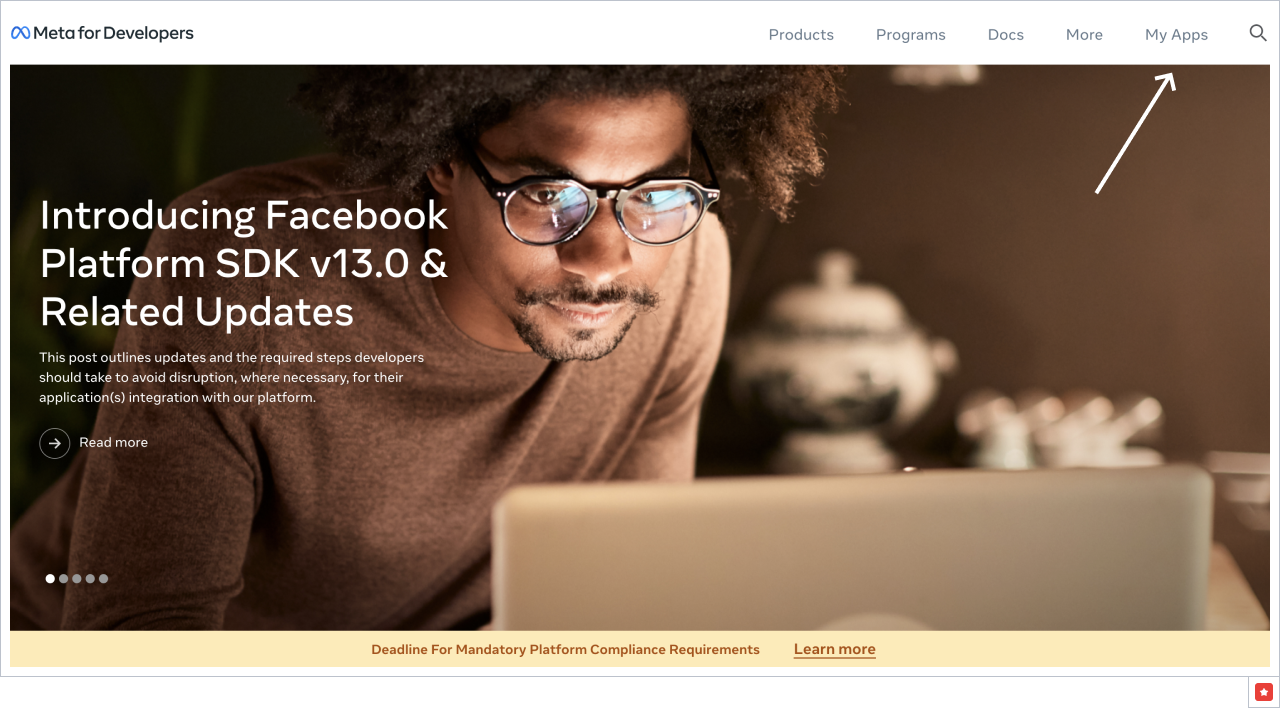
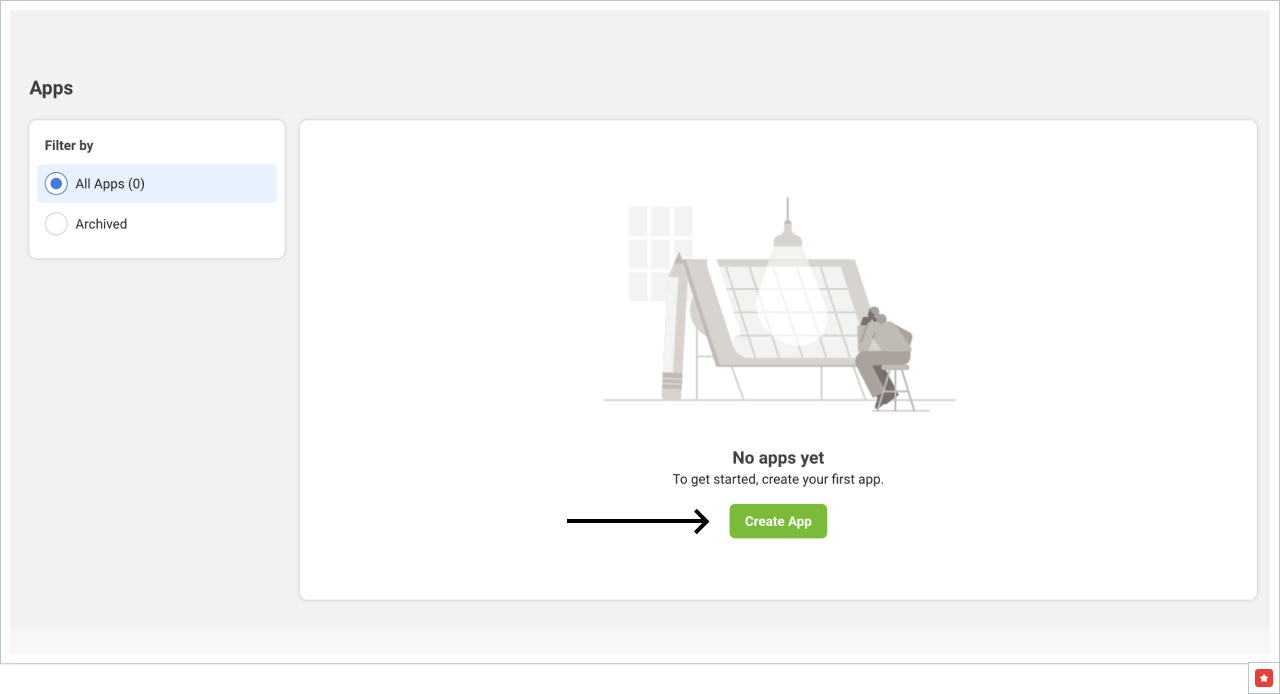
1. Go to My Apps and press the button Create App.
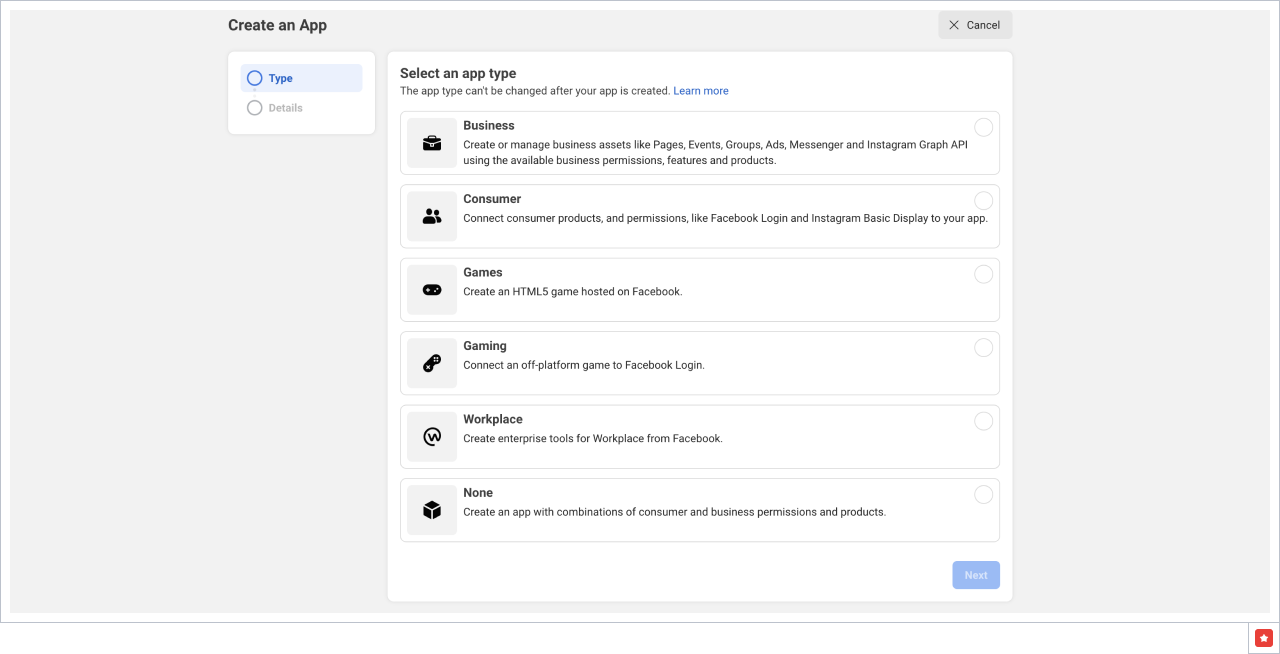
- Select an app type based on your needs. Learn more about the types here.
The app type can't be changed after your app has been created.
In the example below the Business type has been chosen.
- Fill in the following information:
- Display Name,
- App Contact Email,
- choose App Purpose,
- Business Manager account (if needed).

- After creating the app, go to Settings → Basic.
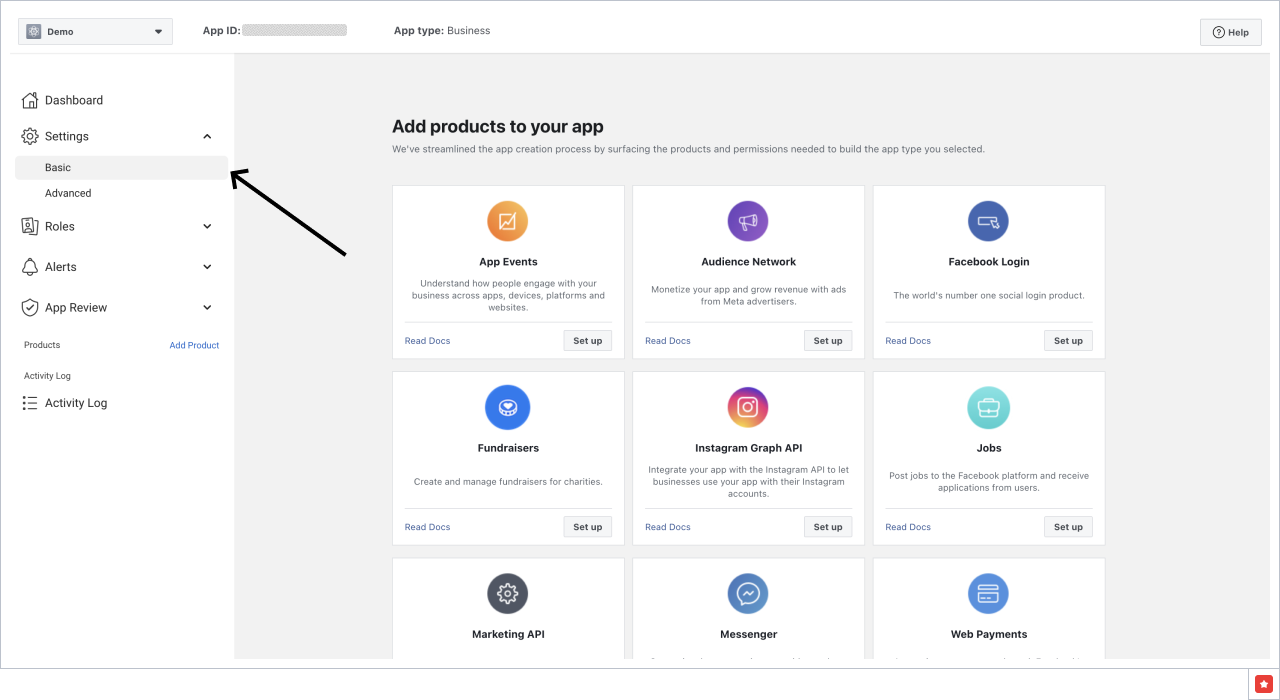

You will need the following information from this page:
-
App ID,
-
App Secret.
Save App ID and App Secret, you will need them later.
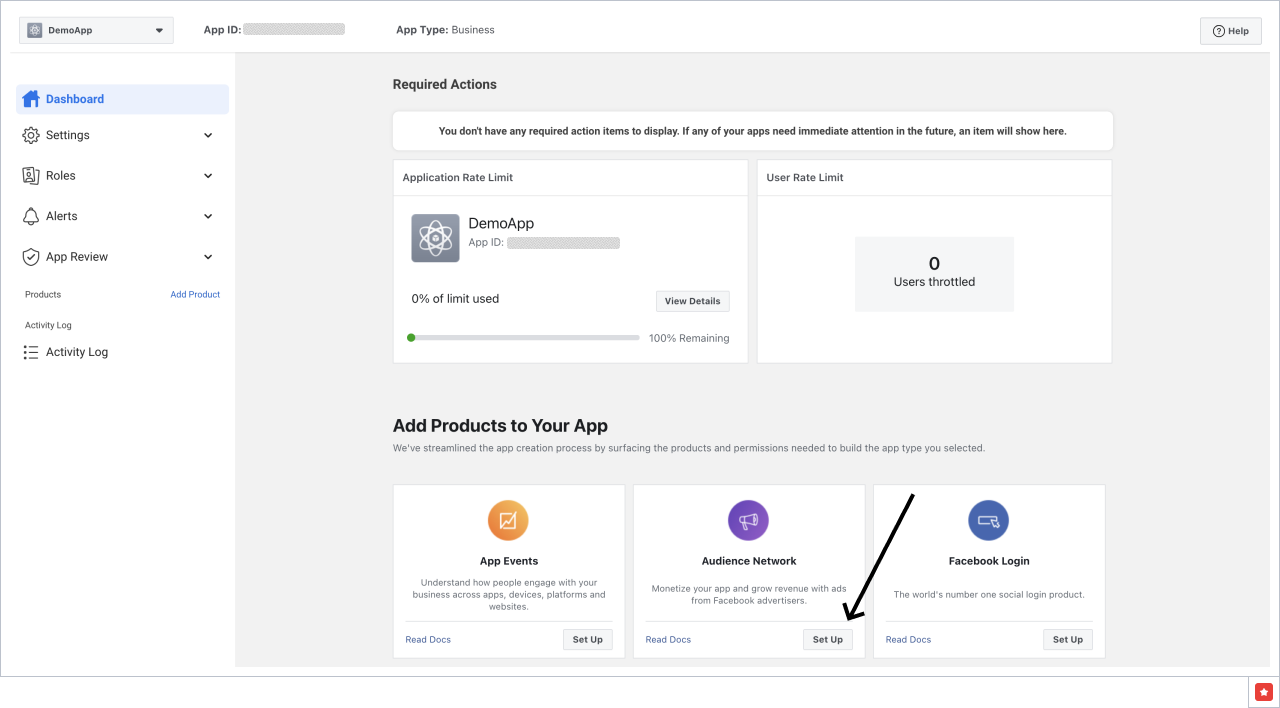
Step 3. Configure the Monetization Manager account
Once the Meta app is created, you will need to connect it, if not previously connected, with Meta Audience Network.
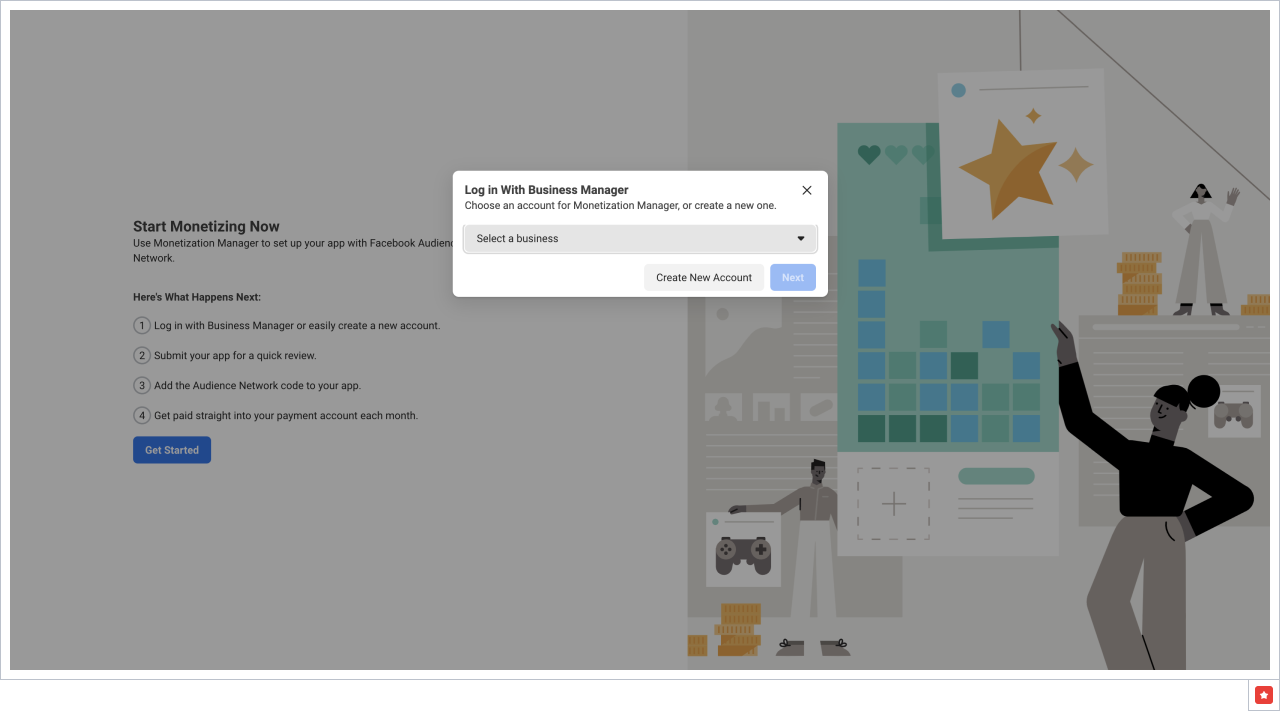
Go to app’s Dashboard and click Set Up for** Audience Network**.
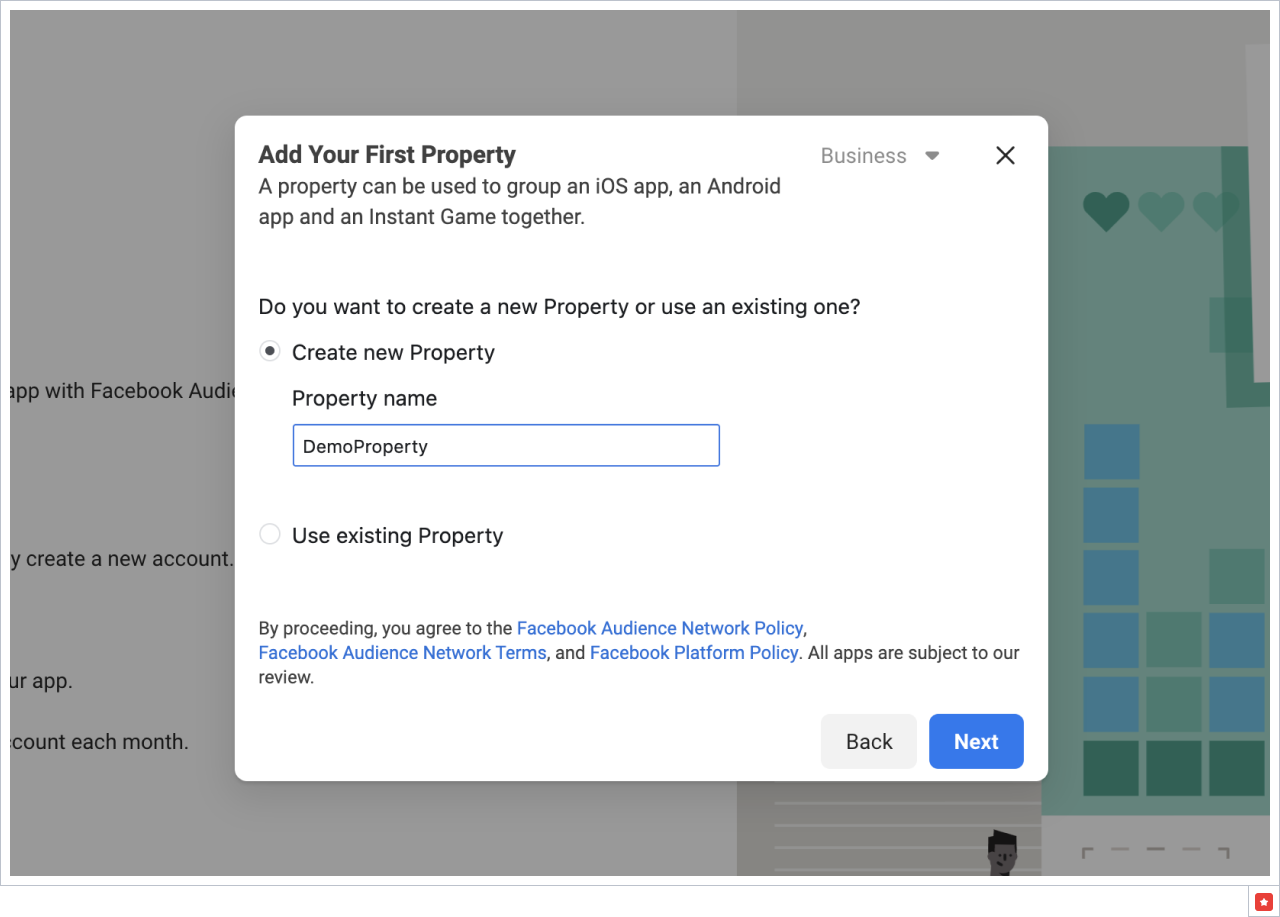
Create a new property on the Monetization manager's side.
Create a new app for the necessary platform in the created Property.
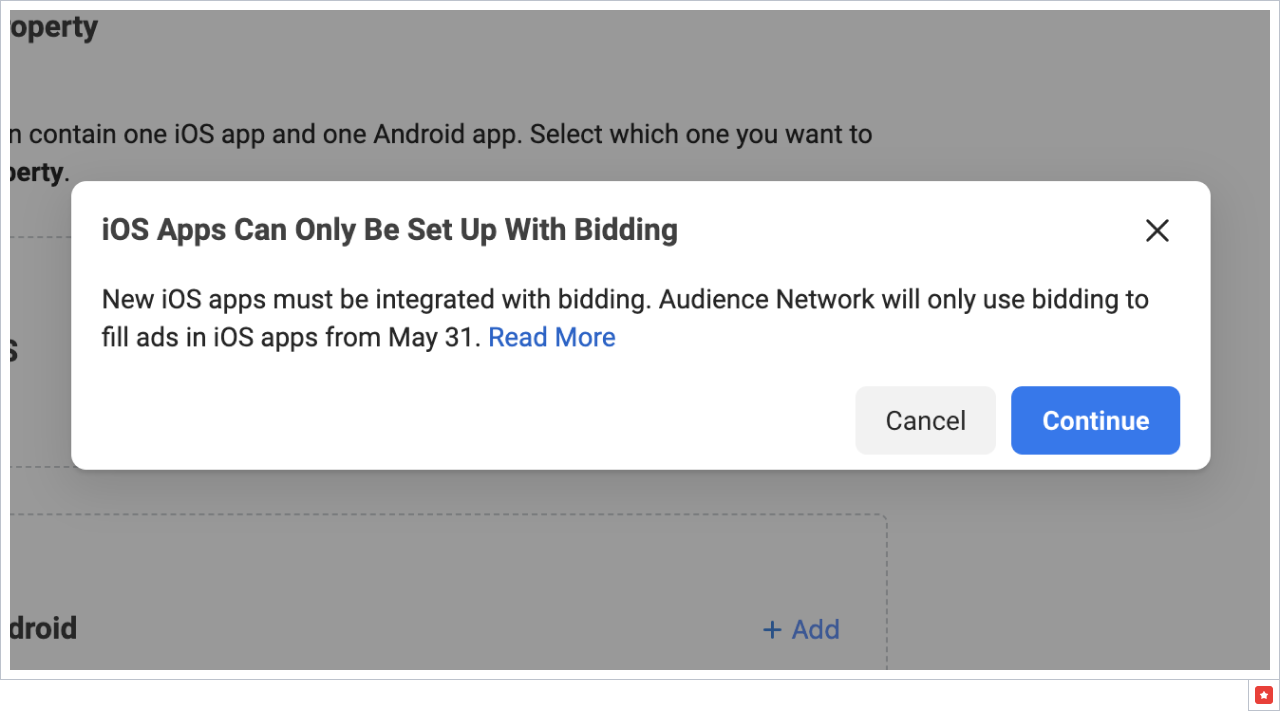
Click on +Add and proceed with the message notified that Meta is working only with bidding for new apps.
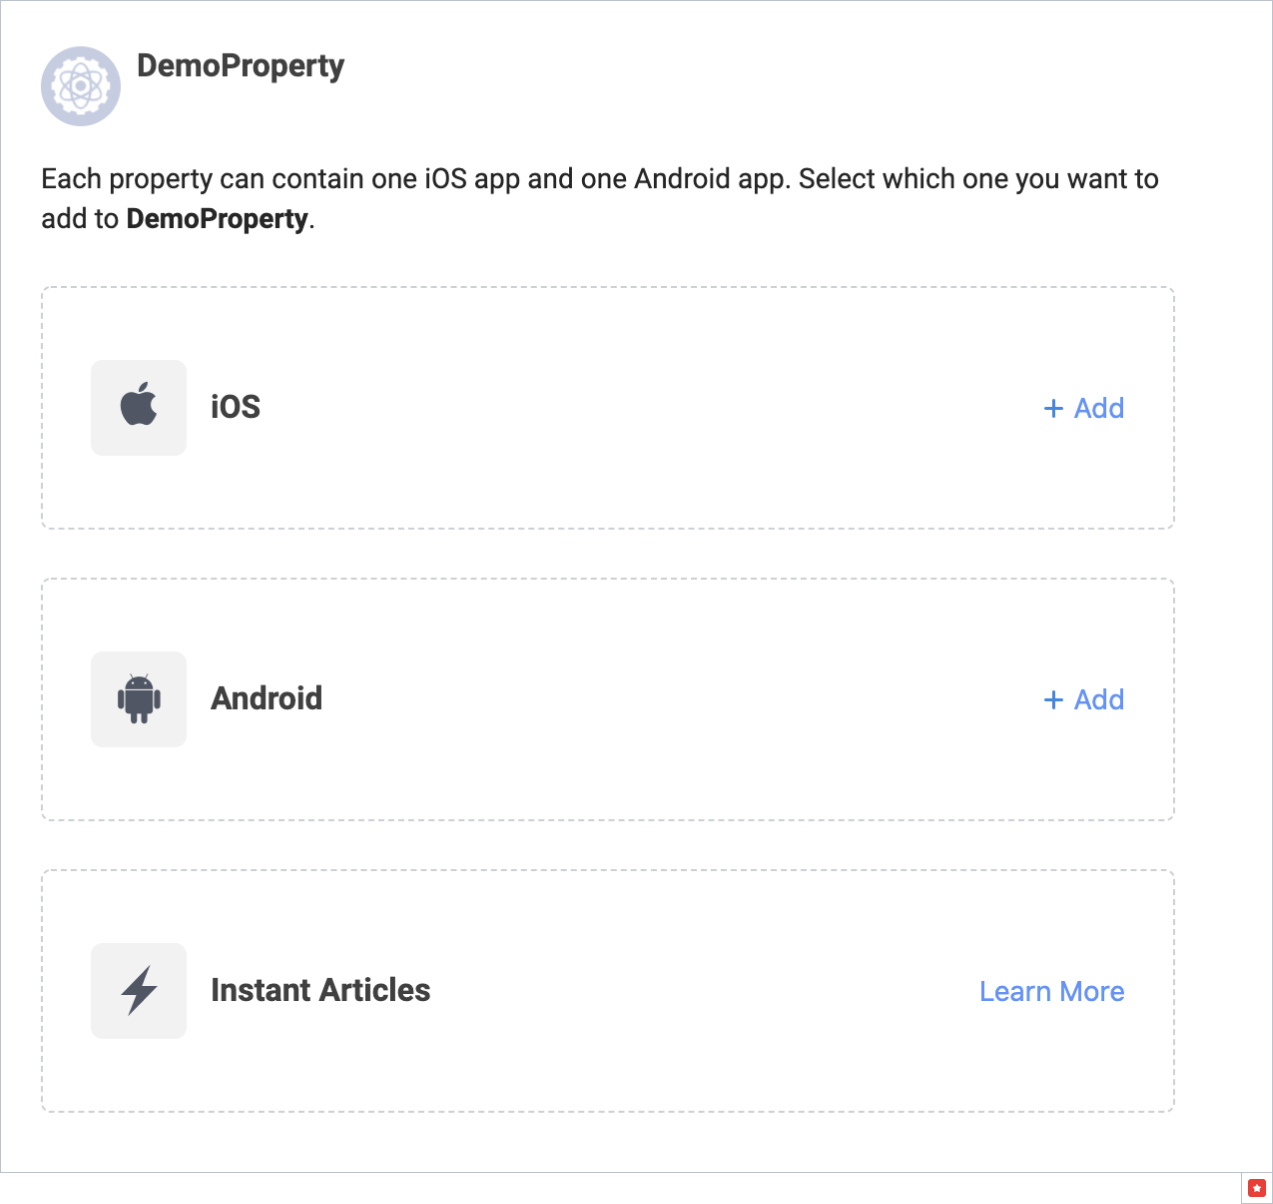
Organize your products with properties.
If your product has multiple versions based on operating systems or devices, you can group these versions into a property for combined reporting and management.
Each property can contain one iOS app, one Android app, one website domain, one Instant Articles Page, and one Instant Game.
For each property, you can create 4 ad spaces. Ad space is a location for advertising.
You can create 4 placements for each ad space - a specific type of ad.
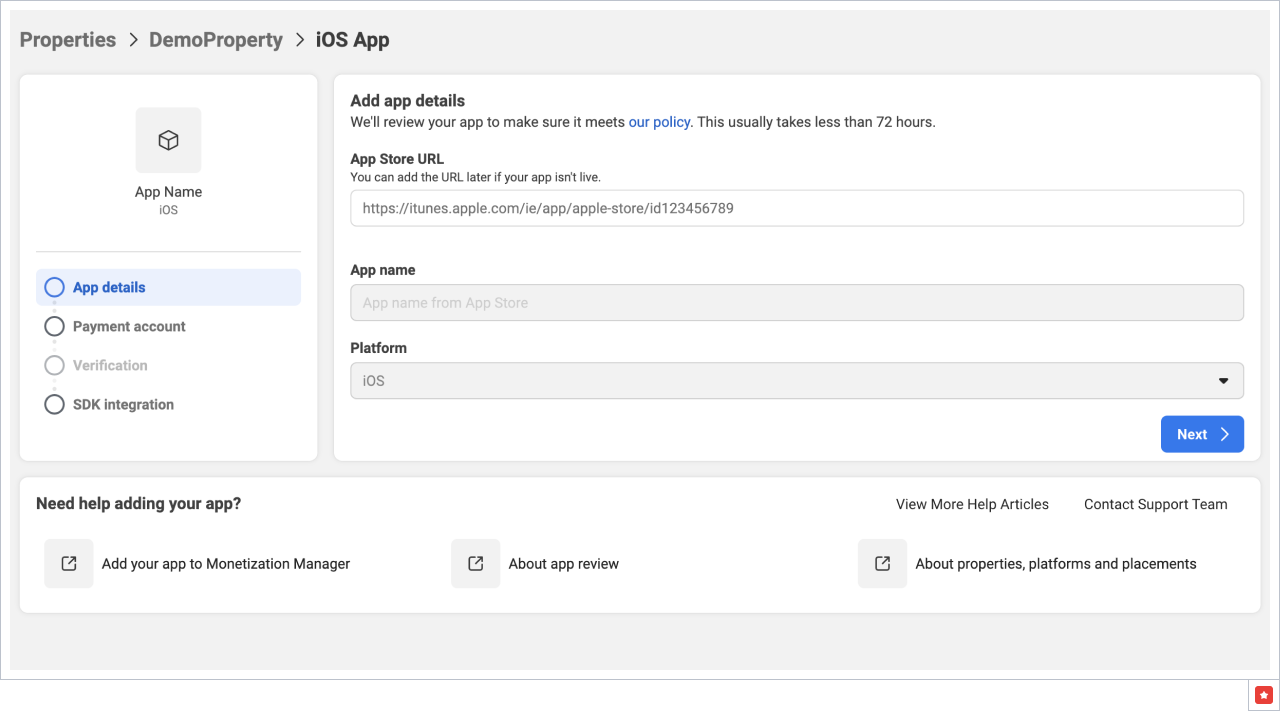
Setting up a new property consists of 4 stages:
1. Add app details. If your app is already published, specify a link to the store. You can add the URL later if your app isn't live.
2. Add a payment account. Click on Add a new payment account and proceed with your payment data.

You won't be able to receive any Audience Network ads until you add your payment details. You can add your payment info as soon as your account in Business Manager and Property is set up. Learn more about adding payment information.
-
Verify your business. Learn more about business verification.
-
Integrate SDK.
a. Choose A different mediation platform.
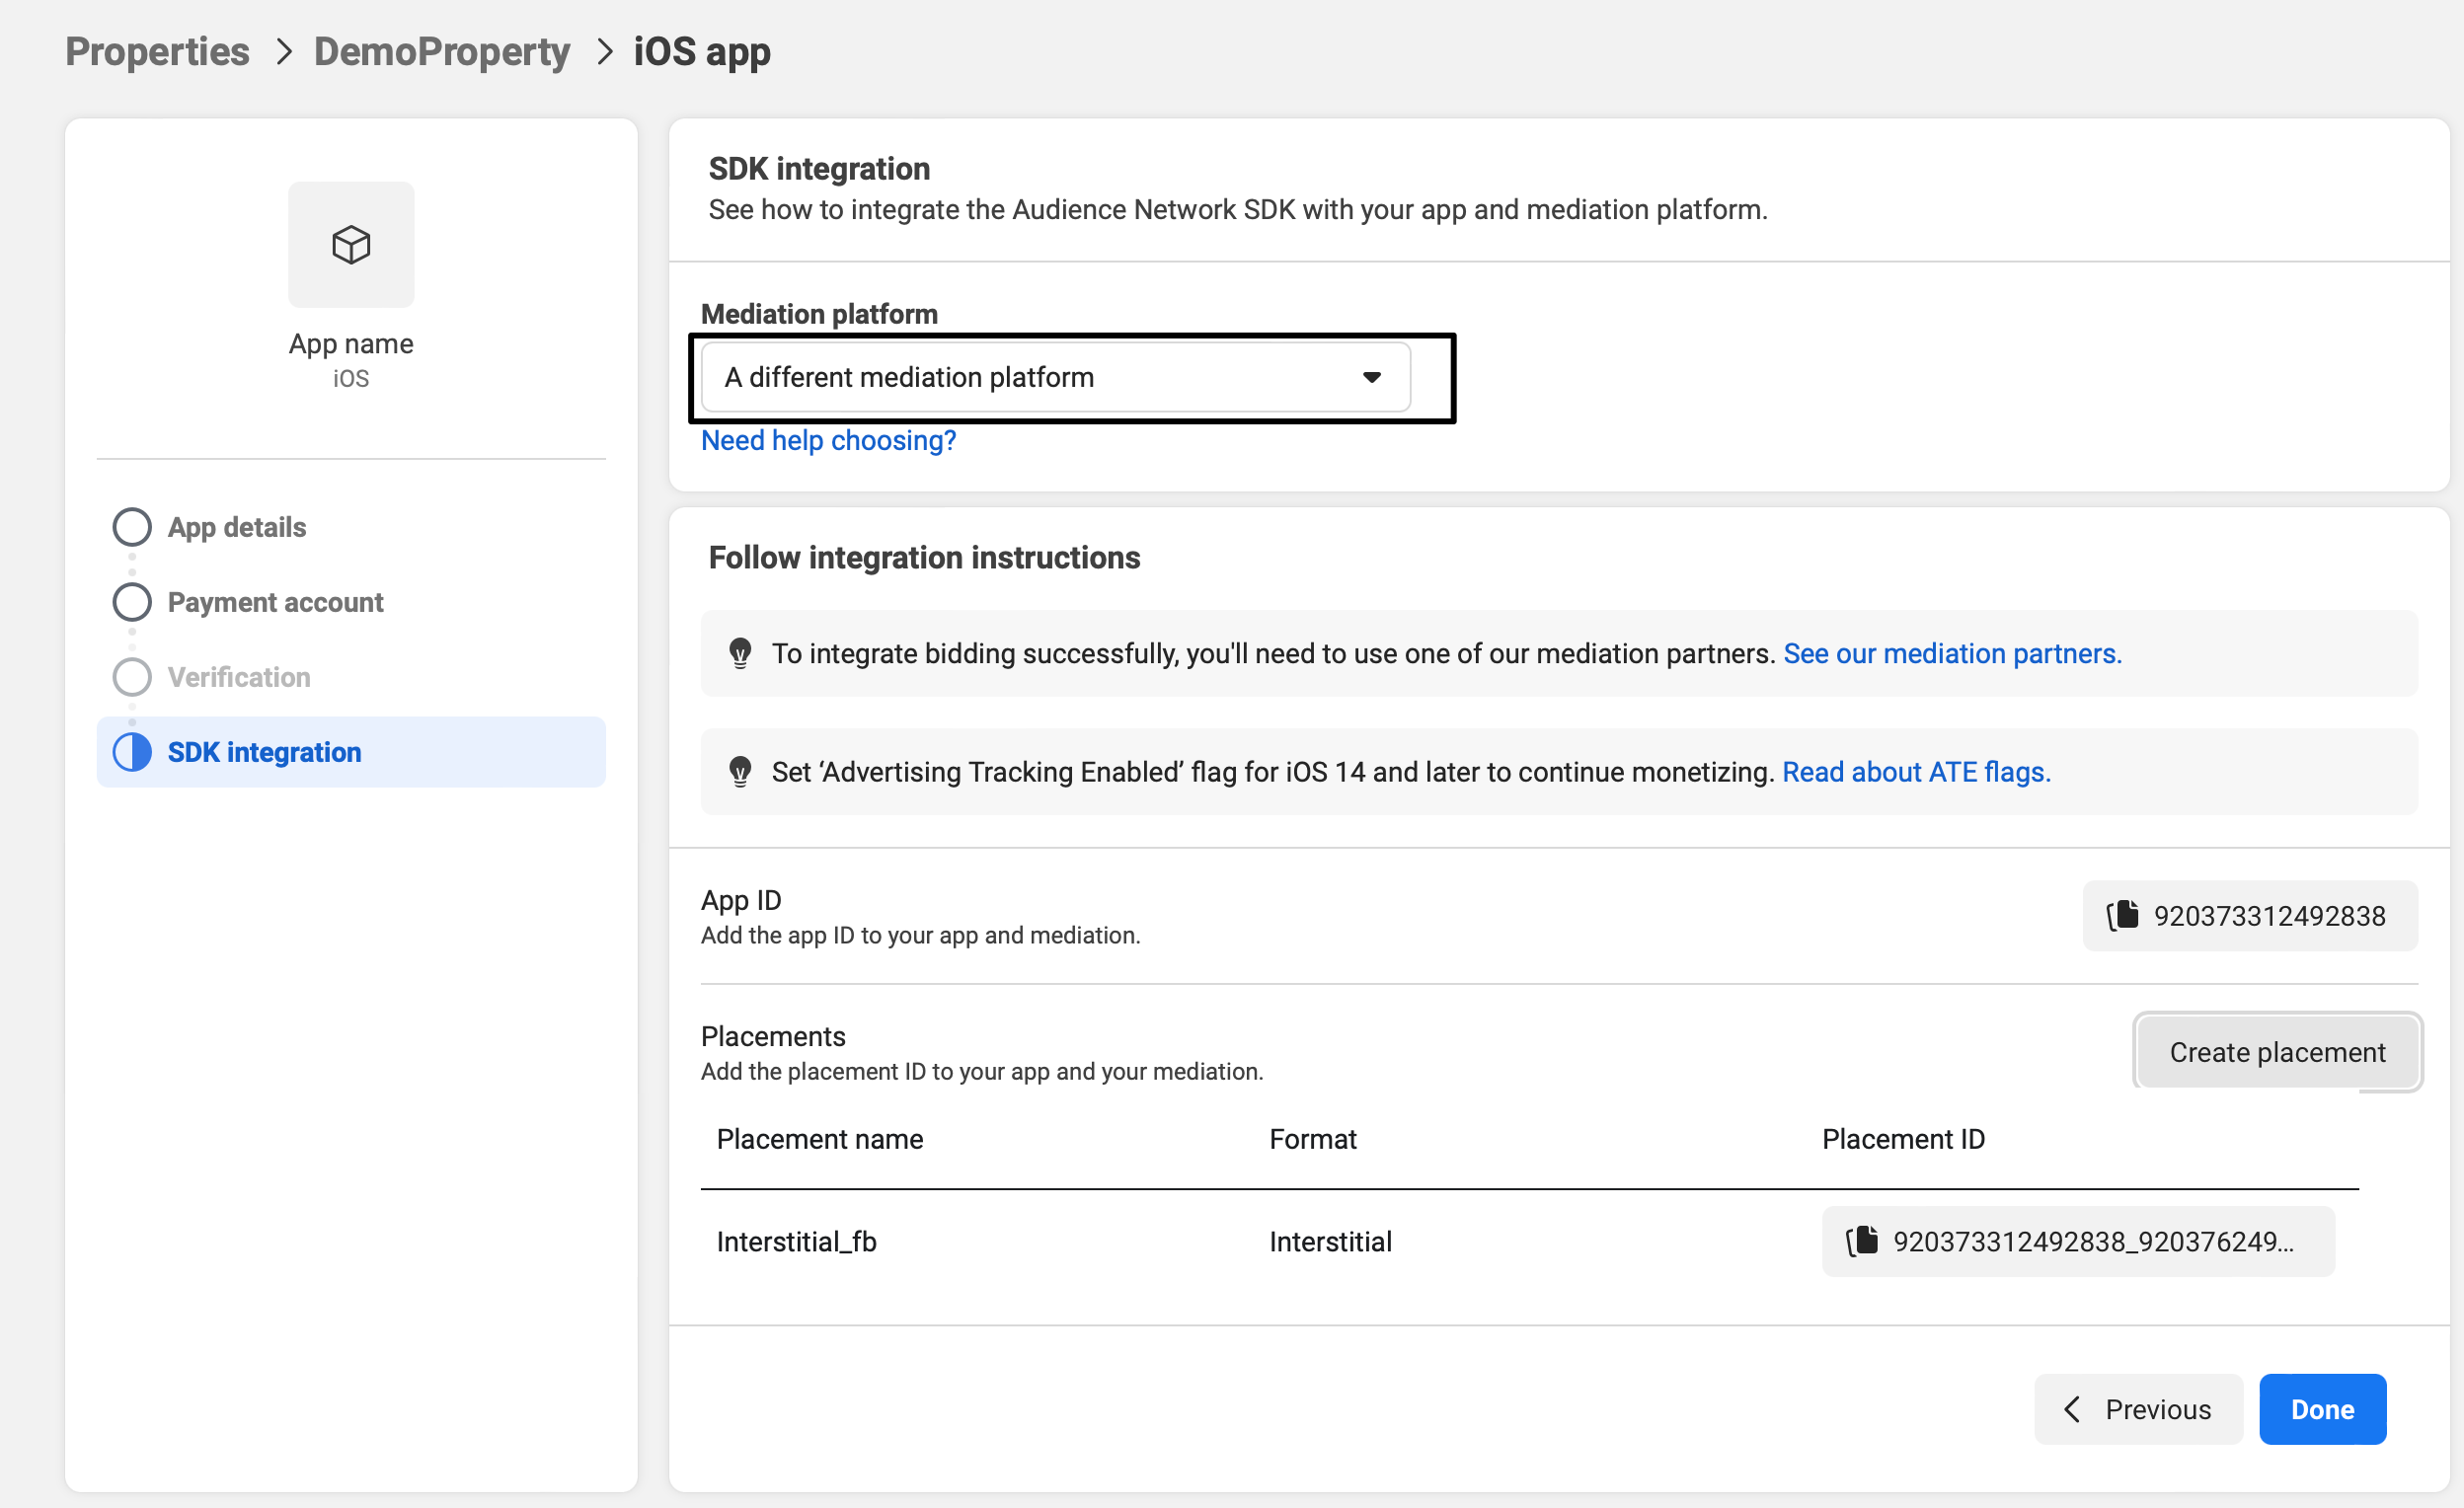
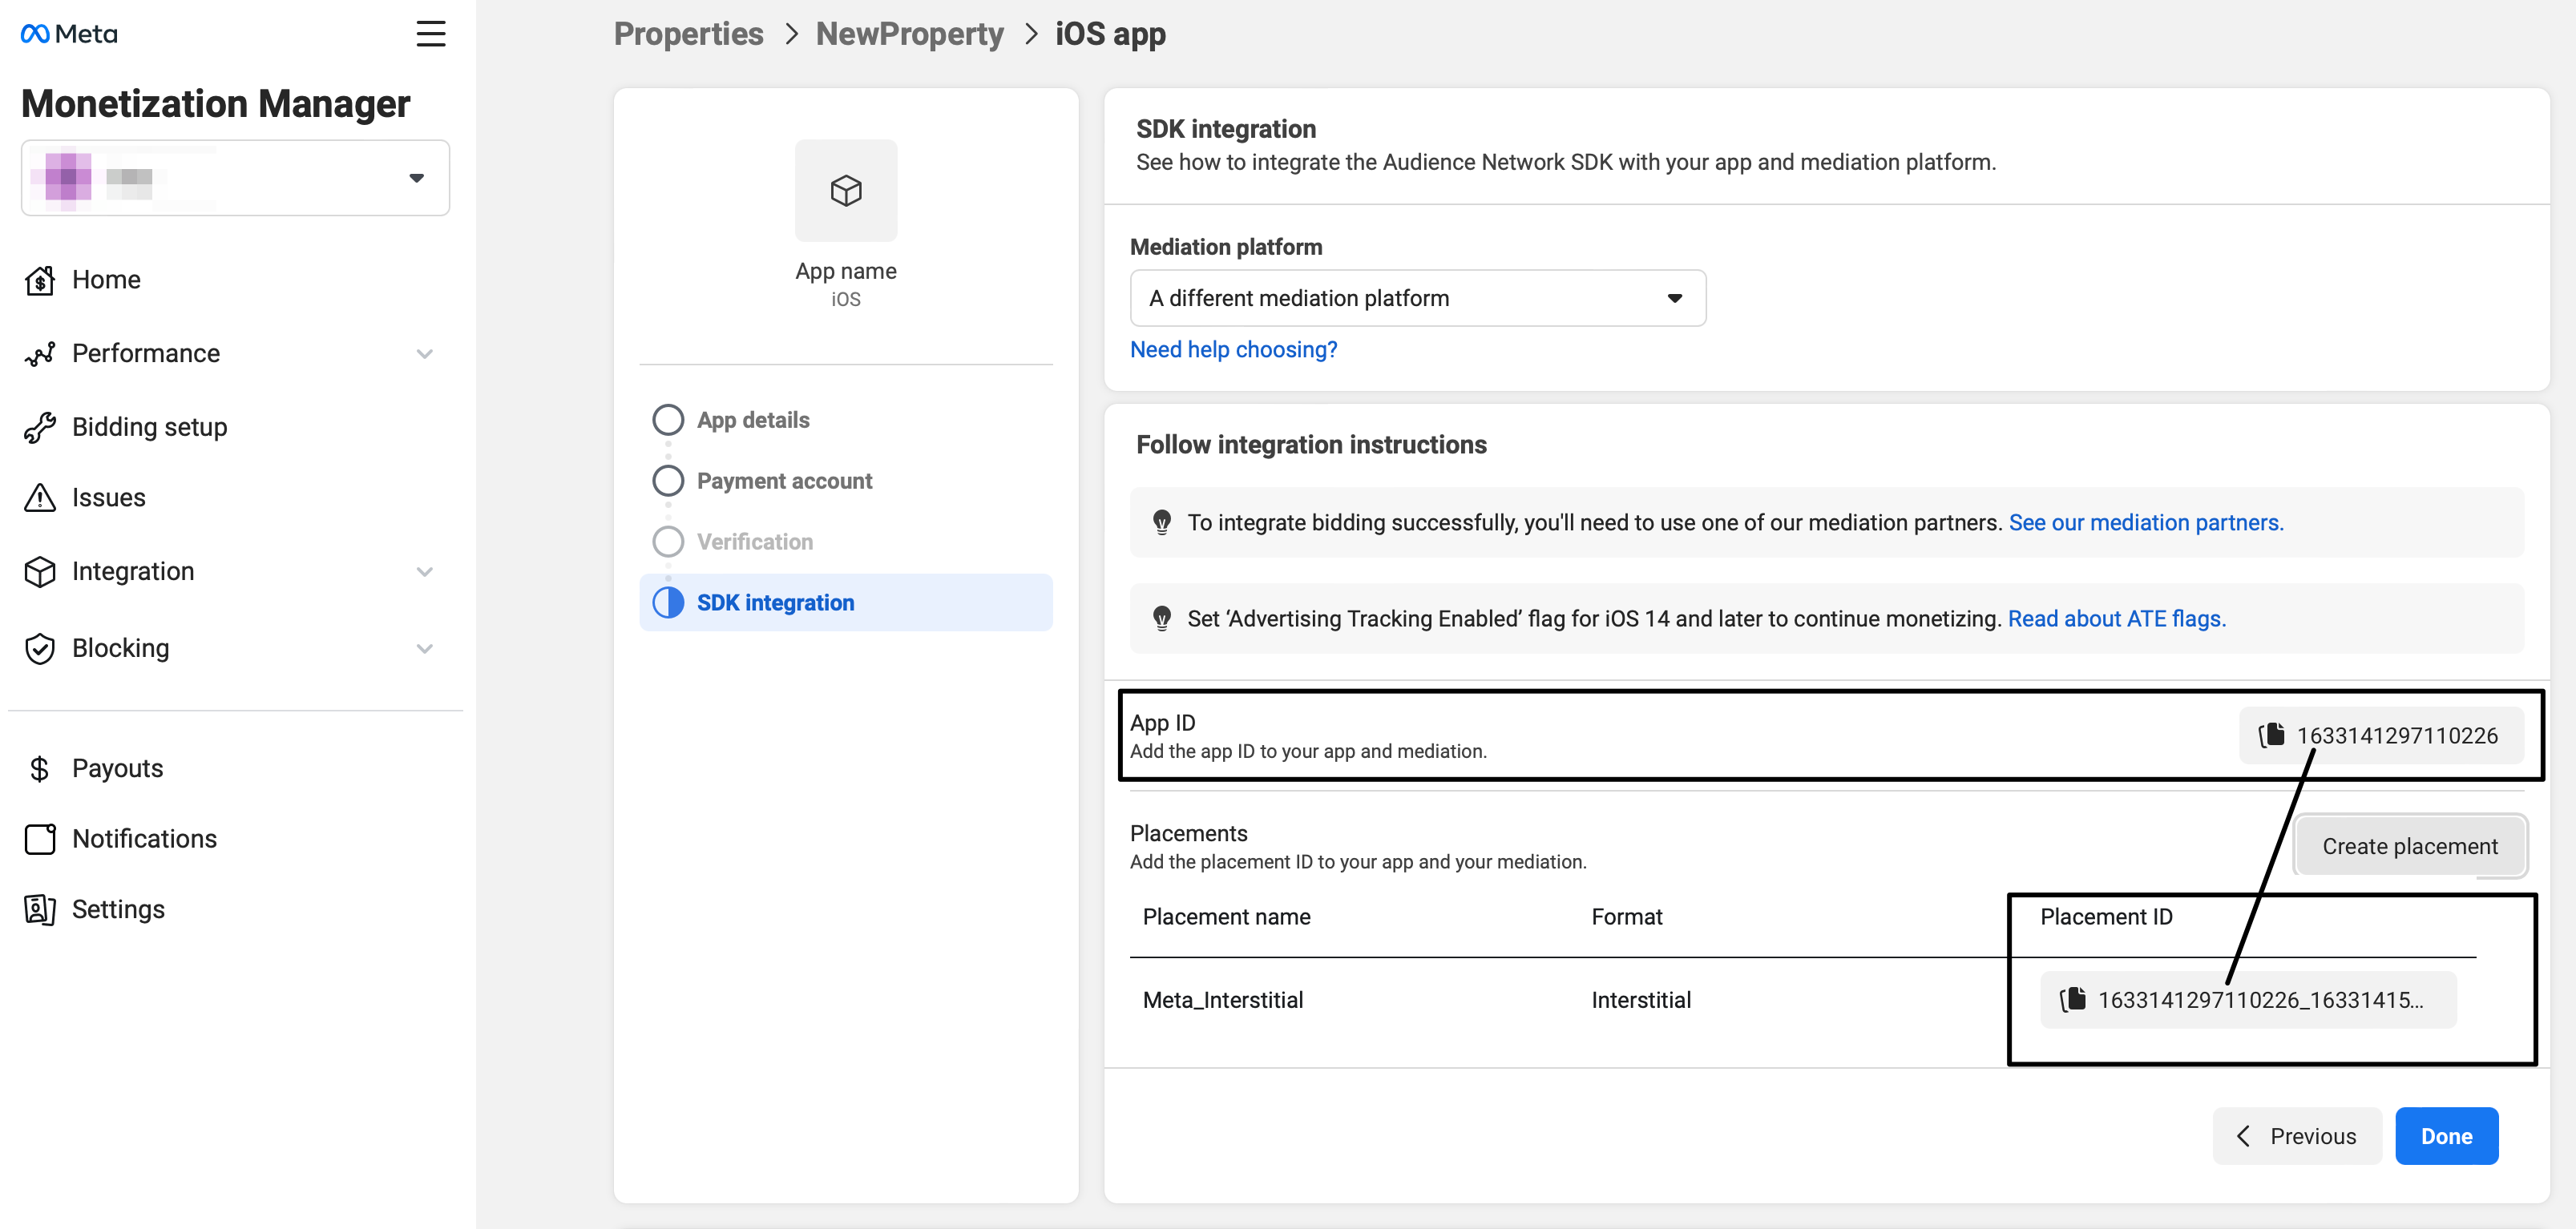
b. Create Placement. You need to select the desired ad format. The most effective ad formats for Meta are Interstitial and Rewarded video (this one is for game apps only).
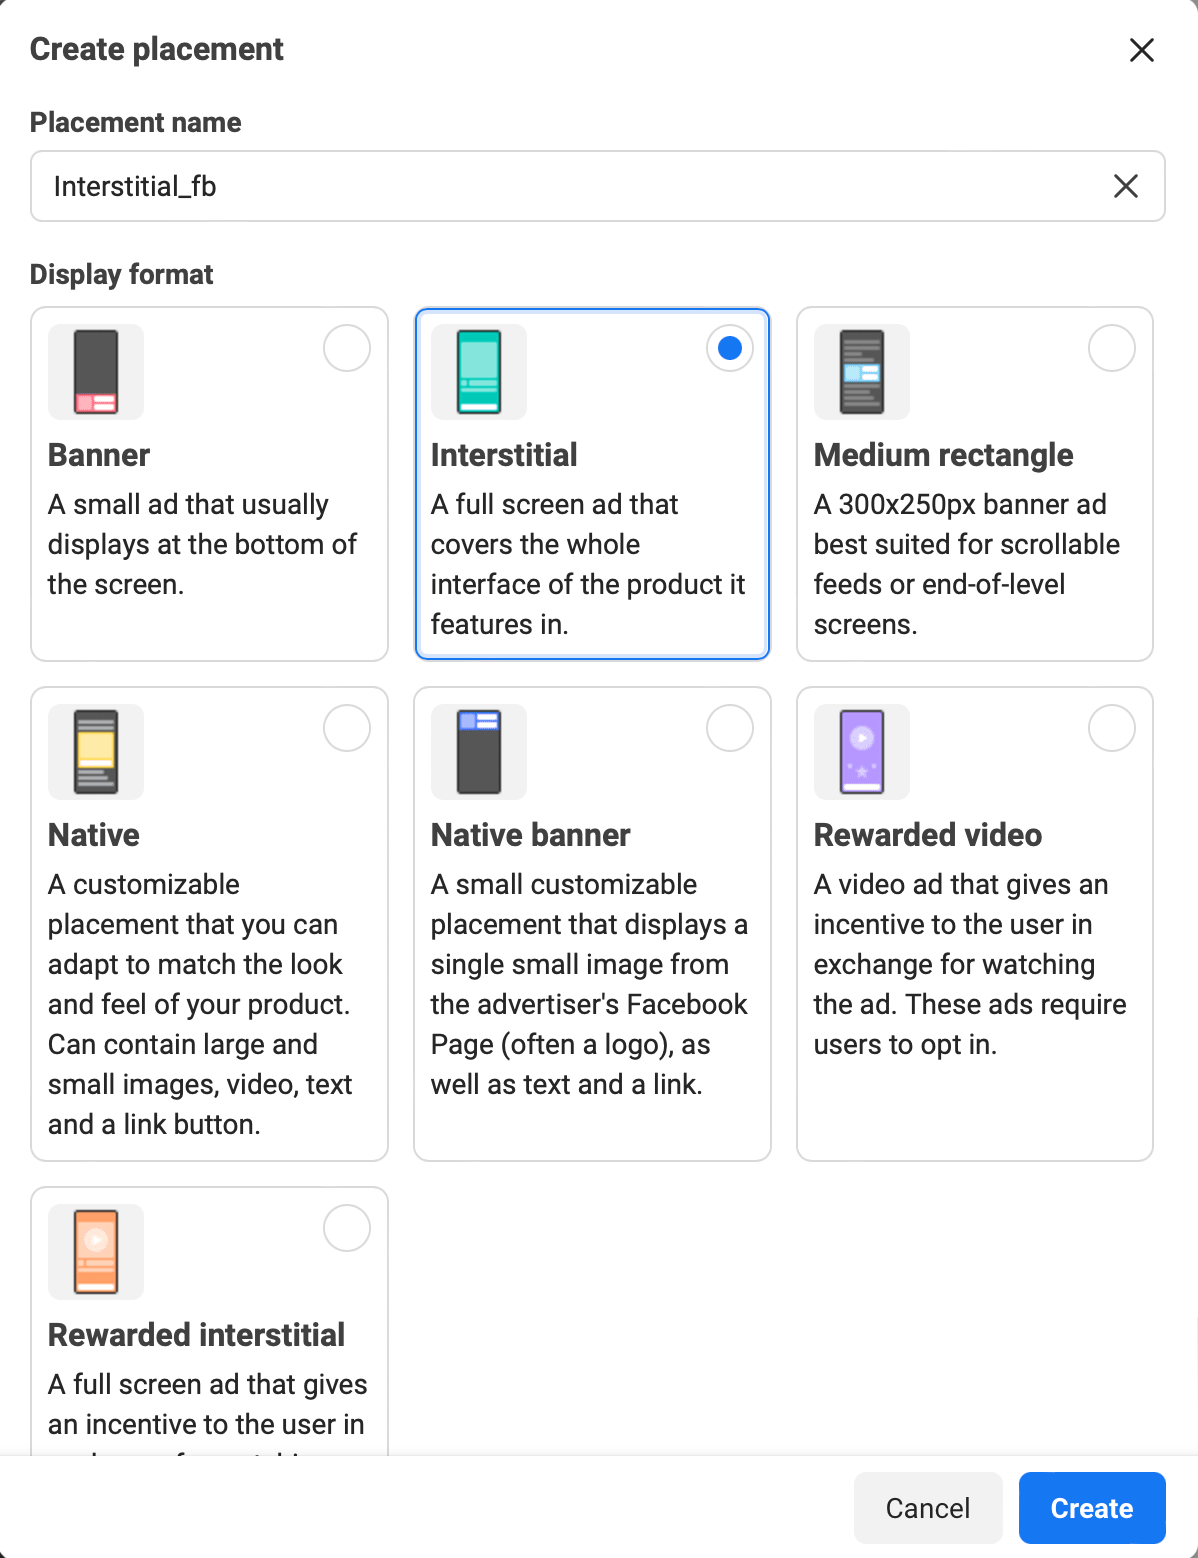
Click on Create and you will see your App ID, and Placement ID’s.
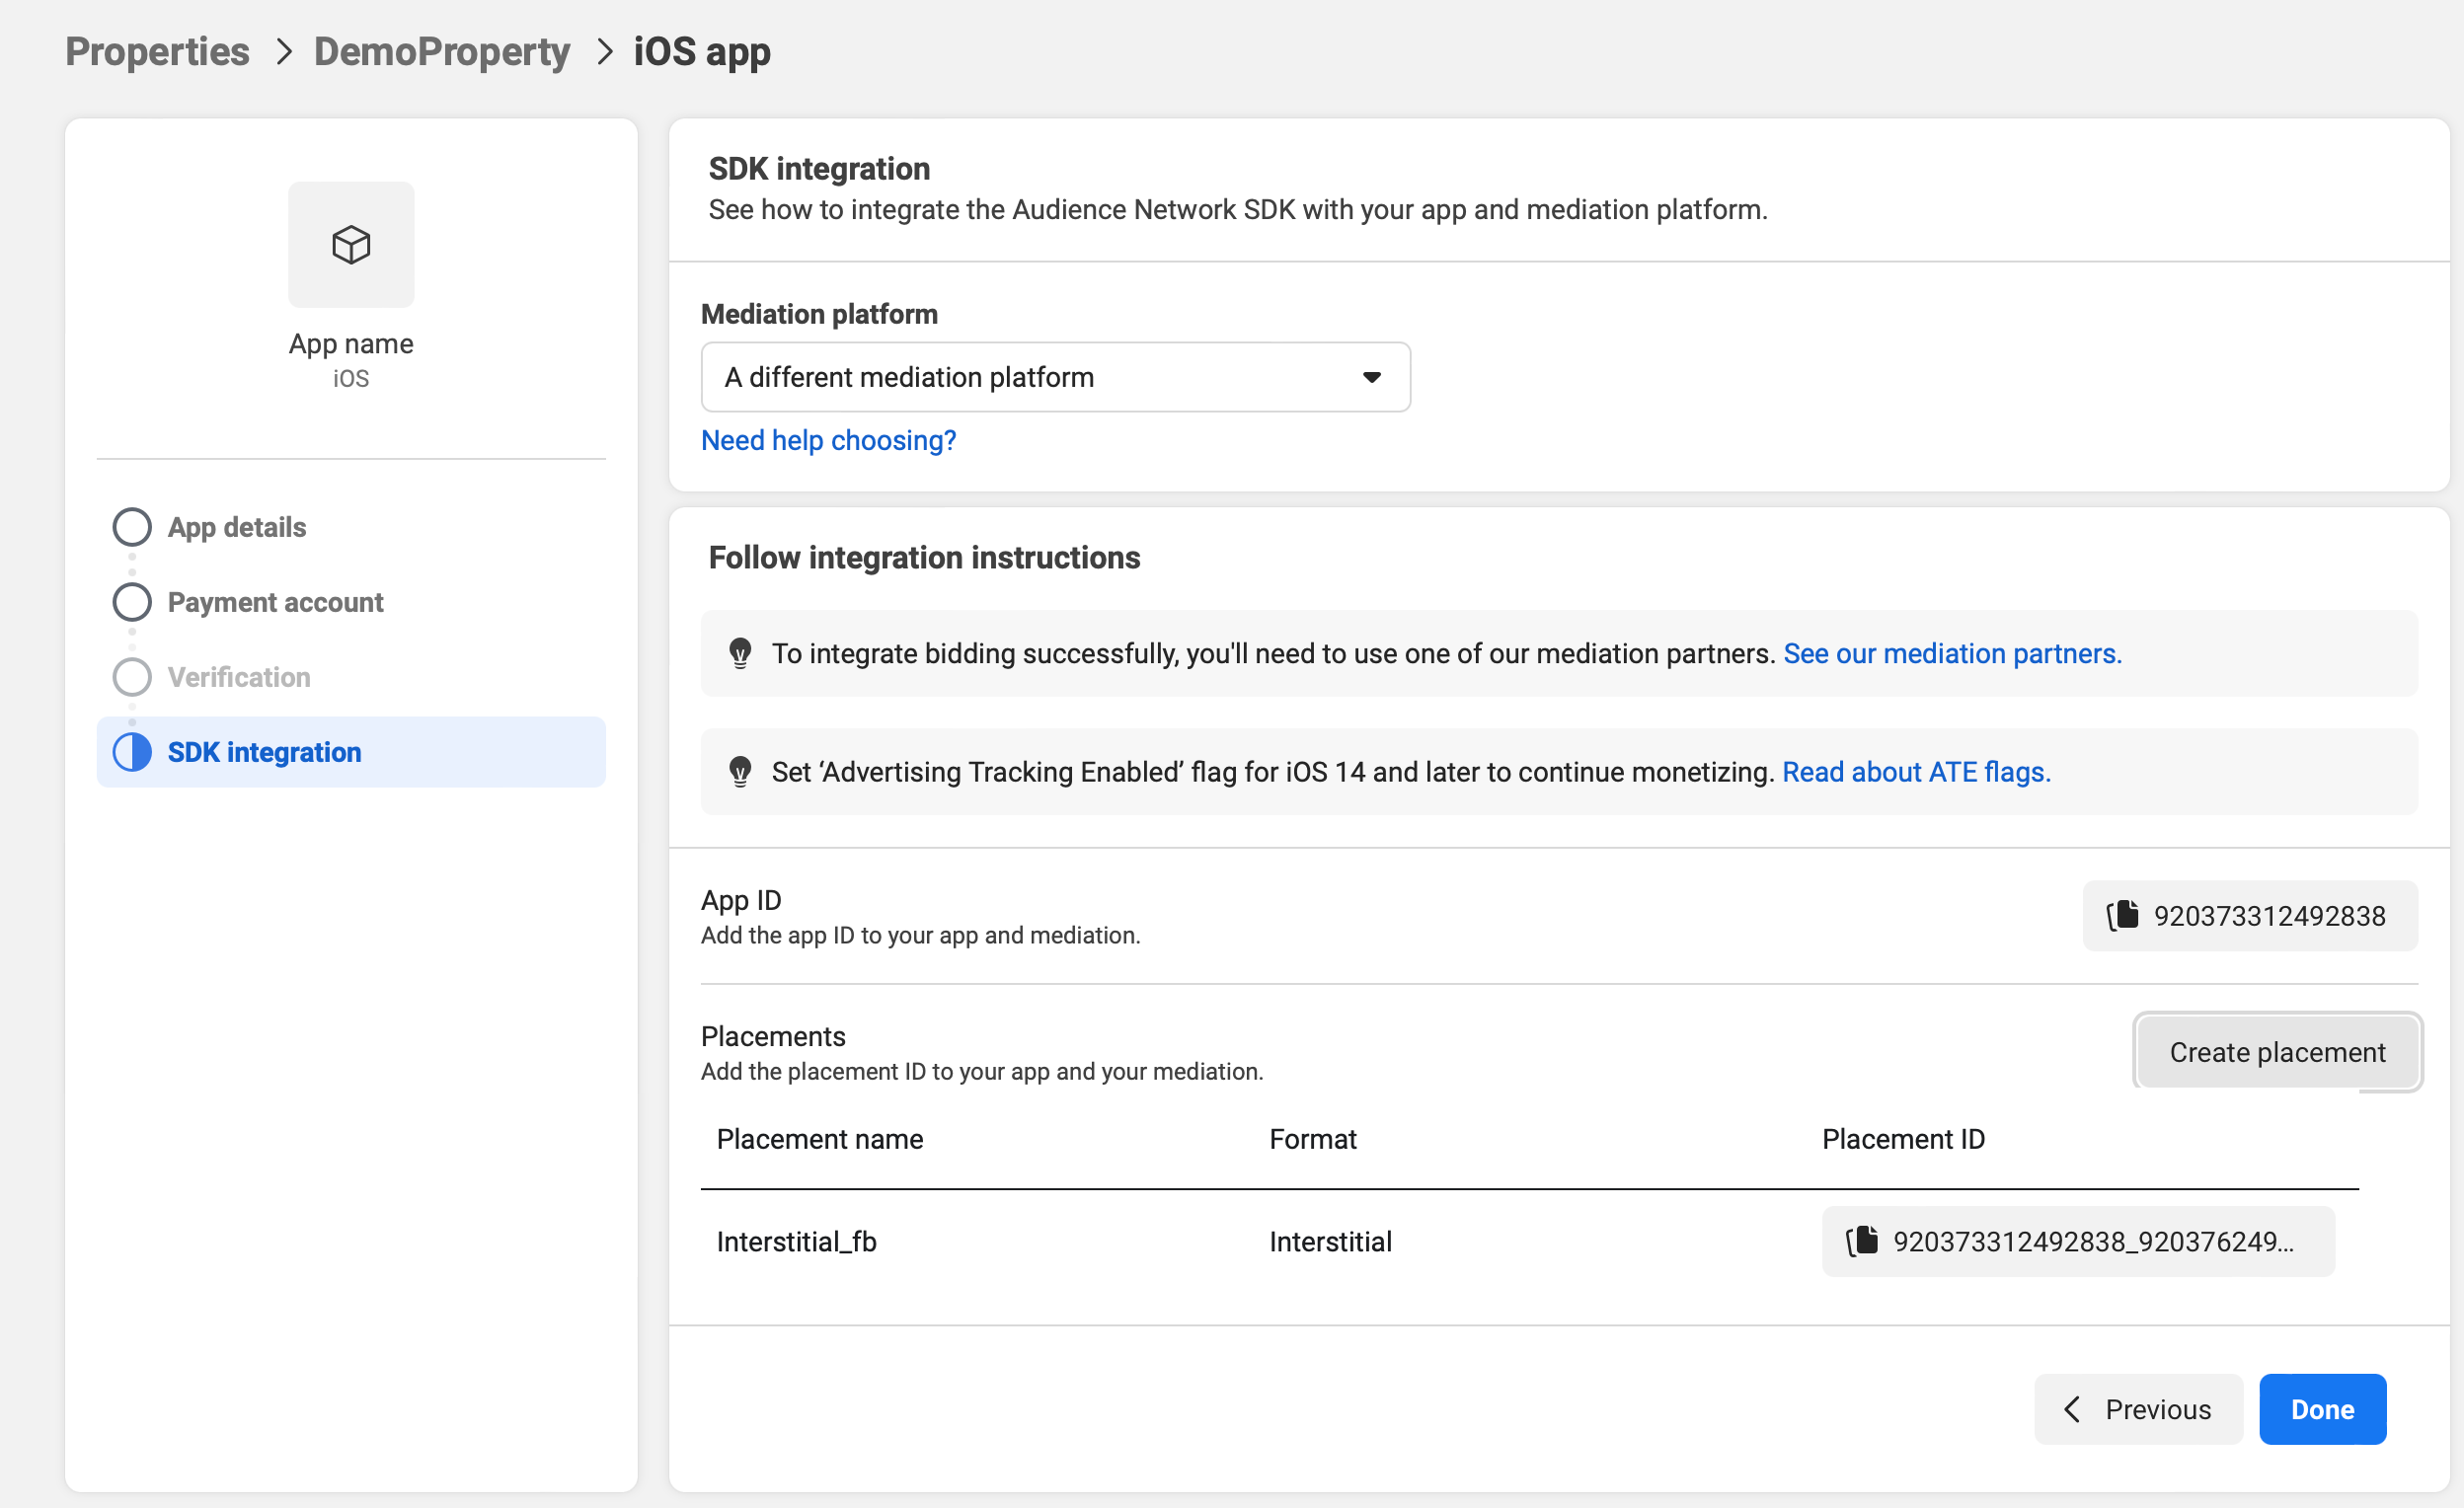
As a result of the previous steps, you should have the following data:
-
App Id;
-
App Secret;
-
Placement Ids.
Save this data. You will need it to bind the app on the Appodeal side.
After you have created your app, set up monetization, published it and submitted for review, added the link to the privacy policy (App Settings → Basic) and user data deletion (you can add the same as the link to the privacy policy), you need to switch the app state to Live.

Step 4. Link your Meta Audience Network account with Appodeal
Go to the Networks Accounts page and add a Meta email address.

Step 5. Create line items for your app
Select the appropriate app on this page, go to the desired ad type, select a Meta account created in Networks Accounts and fill in the Meta App ID and Meta App Secret fields.
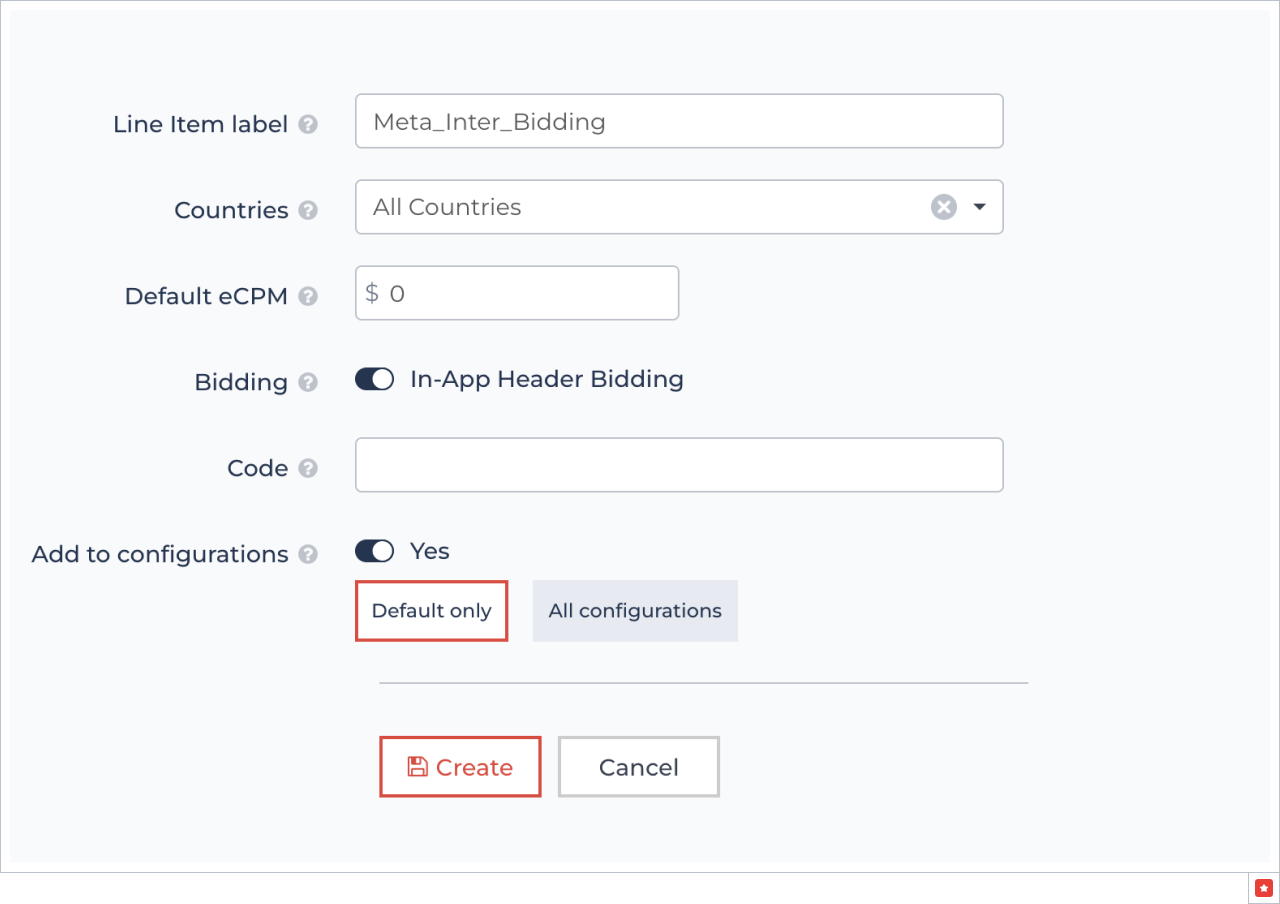
Next, click the Add Line Item button, enable In-App Header Bidding mode and fill in the Line Item’s label and Code:
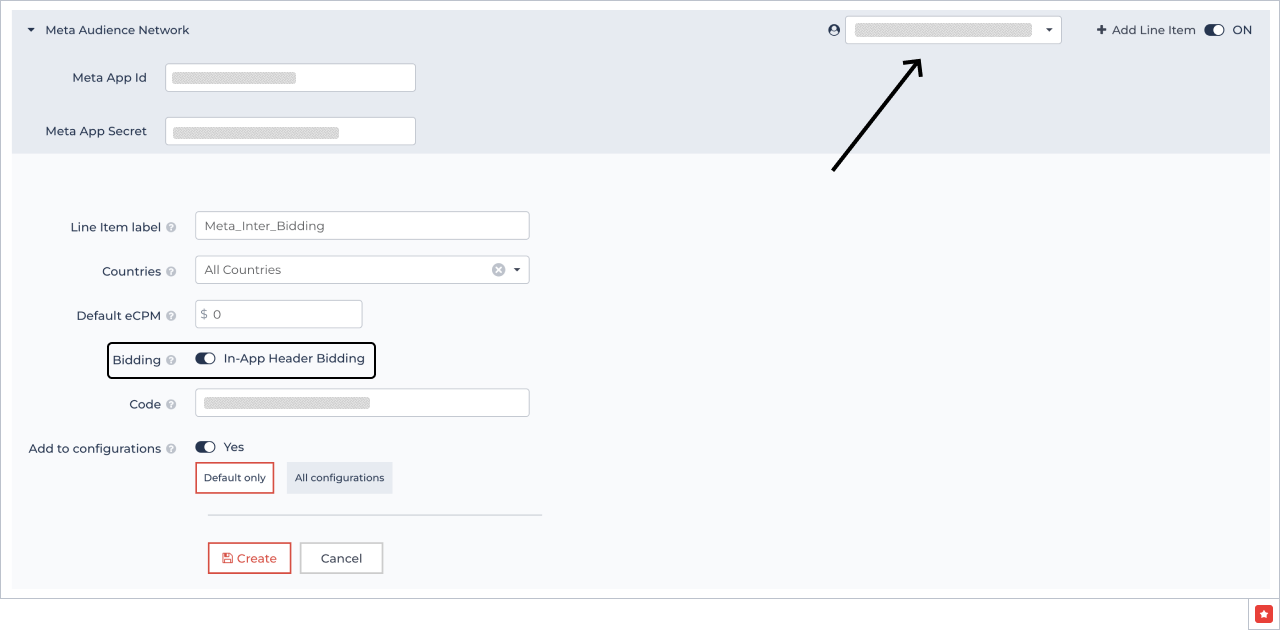
It is necessary to set up In-App Header Bidding mode, otherwise Meta Audience Network ads won’t work.
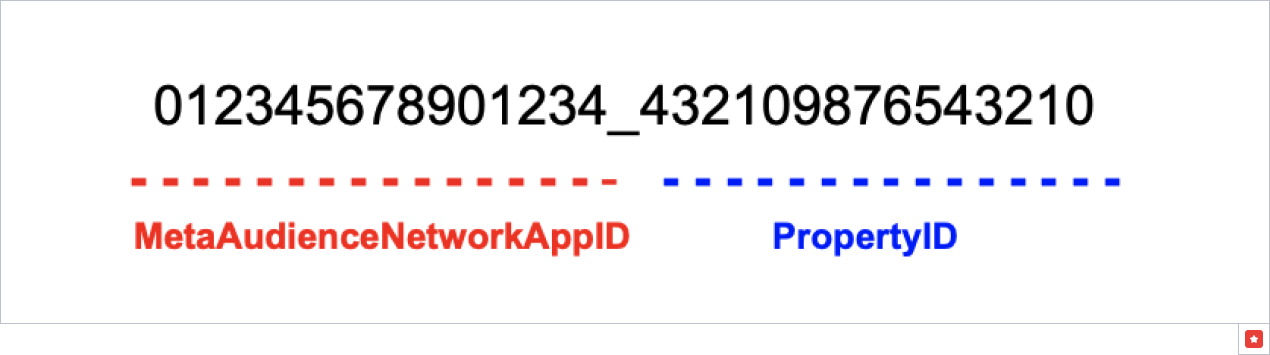
The code is a placement id. The code must have the following format:
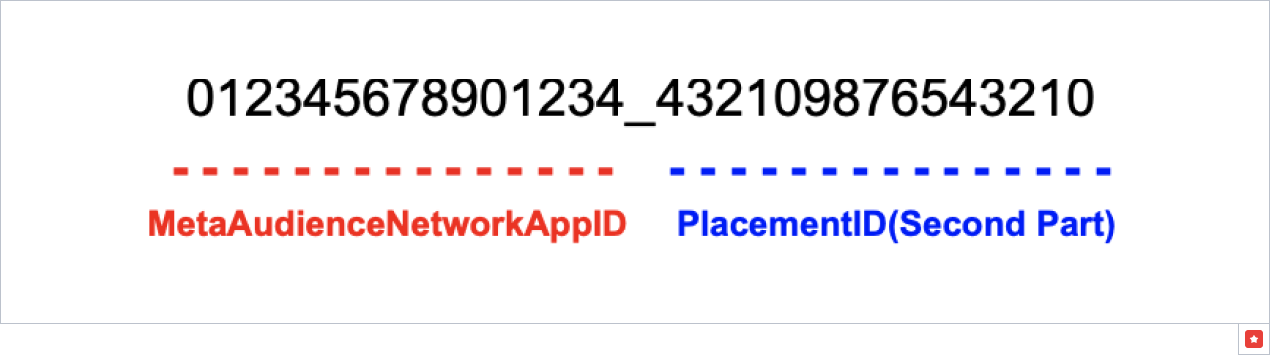
If the first part of the placement ID does not match the app ID, Meta Audience Network won't work.
To fix it, change the first part of the placement ID to the app id.
Step 6. Test your Meta Audience Network ads
Meta Audience network bidding works through BidMachine. If another BidMachine demand partner rather than Meta Audience has an ad with a higher bid for you, it will be shown, even with Meta Audience test mode enabled.
To debug Meta Audience Network ads, check the placement statuses:
-
Ready to publish: You’ve successfully tested your integration and your app is ready to be published to the app store.
-
Idle: Meta Audience Network hasn’t received any ad requests for this placement in the last 24 hours. If you're sending test requests, the placement status will remain "Idle".
-
Requesting Ads: No fill for ad requests for the placement in the last 24 hours.
-
Receiving Ads: Your app is live and there are filled ad requests from live users for the placement in the last 24 hours.
You can see a list of common errors when requesting Meta Audience Network ads here.
If Meta has a low number of impressions and small revenue, the data can be reported from Meta without country info.
If you have any additional questions or difficulties during the setup process, you can contact our support team via live chat or email [email protected].
Step 7. Update App-ads.txt file
Be sure to set up app-ads.txt to help bidders and advertisers identify whether or not ad inventory is being sold by authorized sellers.
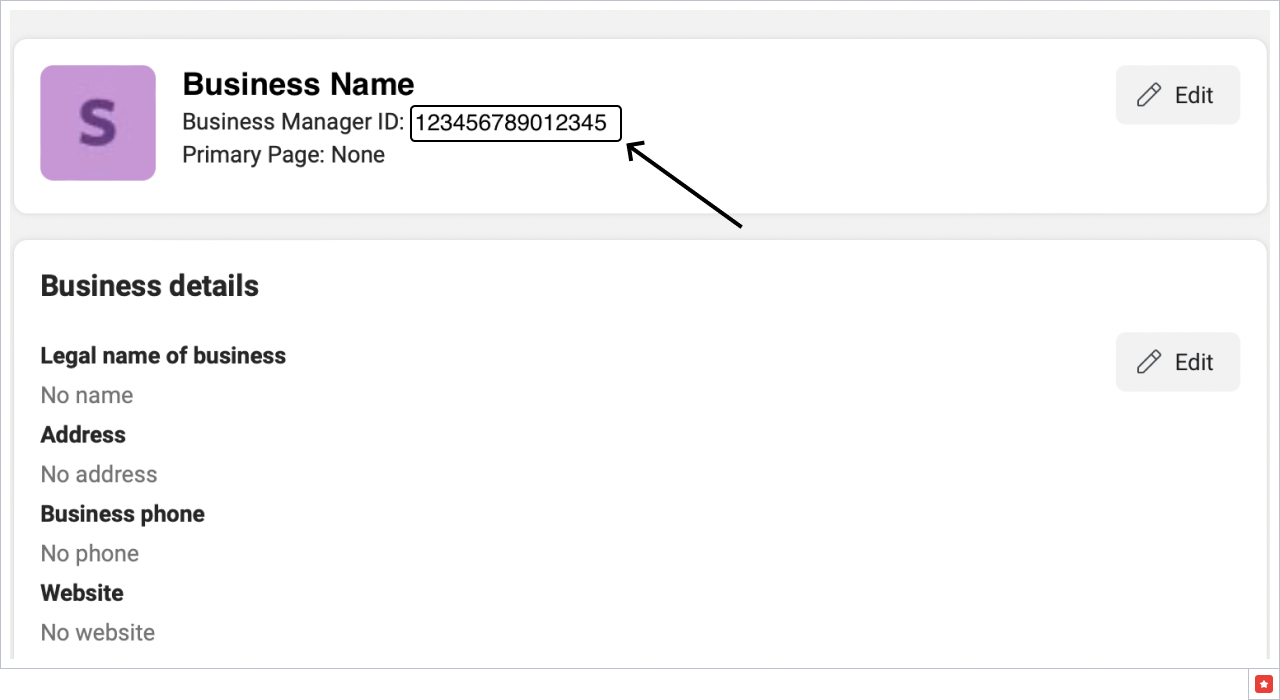
-
Go to Meta Business Settings and go to Business info.
-
Copy your Meta Business Manager ID and replace the “Business ID” with it in your app-ads.txt file.
    #Facebook
    #Replace the Business ID below with your Facebook Business ID
    facebook.com, Business ID, RESELLER, c3e20eee3f780d68
Example:

- Save changes and wait at least 24 hours for ad networks to crawl and verify your app-ads.txt file.
Now you can monetize with Meta through Appodeal.
Switching Meta Audience Network from waterfall mode to bidding mode
-
Make sure you use Appodeal SDK 2.10.3+/Appodeal Unity plugin 2.14.5+.
-
Make sure BidMachine is enabled in Mediation Settings.
-
Make sure you have a BidMachine Adapter in your project. BidMachine Adapter is included in Appodeal SDK by default, make sure you haven't removed it from the project.
-
Starting on 1 September 2022, Meta is fully migrating to using FB Login to access Reporting API. Due to this, please re-connect your account to apply the necessary changes and continue receiving the revenue stats from Meta Audience Network in Appodeal dashboard. Go to Integrations -> Mediation Ad Networks and click on “Re-connect” next to your Meta Audience Network account.

Step 1. Choose line items
Choose one line item for each ad type with the highest revenue. You will need to add them to Header Bidding later.
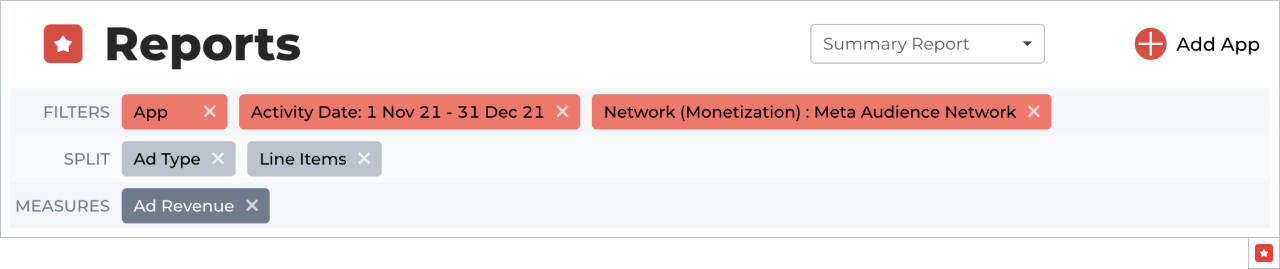
1. Go to your Dashboard.
2. Create a report with filters App, Ad Network (select Meta Audience Network), split by Line Items and Ad Type. Add Ad Revenue measure.
You can use this template to generate a report. Select your app in it.
Step 2. Set up line items
Go to App Settings → Mediation Settings → Line Items. Select the ad type and open the Meta Audience Network line items list.
Save the code for chosen Line Item and remove all the Meta Audience Network Line Items.
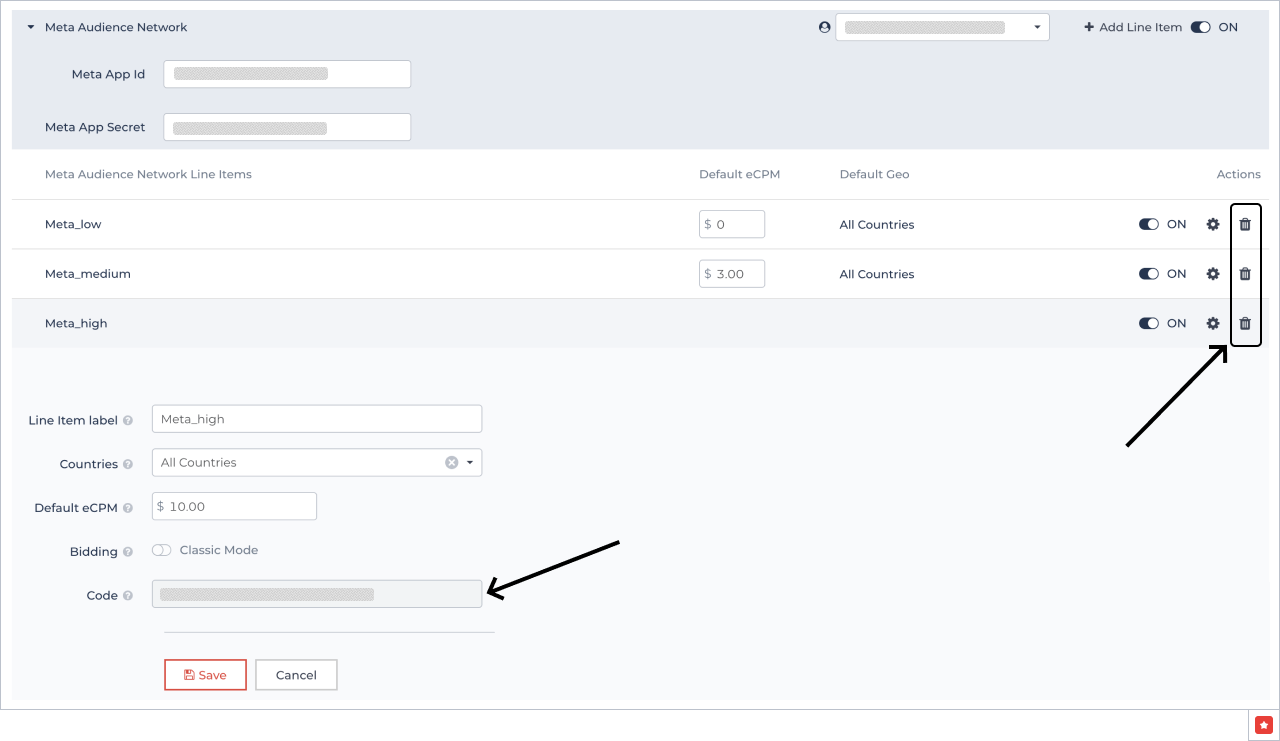
Step 3. Create a new in-app header bidding line item.
1. Click the Add Line Item button.
2. Enable In-App Header Bidding mode.
3. Fill in the Line Item’s label, default eCPM.
4. Use the same Line Item Code (placement ID) of the ad unit chosen in step 1 and saved in step 2.
It is necessary to set up In-App Header Bidding mode, otherwise Meta Audience Network Audience ads won’t work.
The Code is the placement id. The Code must have the following format:
If the first part of the placement ID does not match the app ID, Meta Audience Network won't work.
To fix it, change the first part of the placement ID to the app id.