Step 1. Import SDK
Choose the desired integration type and follow the steps below to add Appodeal Plugin into your project.
- UPM Distribution
- Manual Distribution
-
Download External Dependency Manager (.tgz one) v1.2.175 or newer from this website.
-
Import EDM into your Unity project by adding the downloaded archive via Unity Package Manager (Window → Package Manager → "+" → Add package from tarball).
-
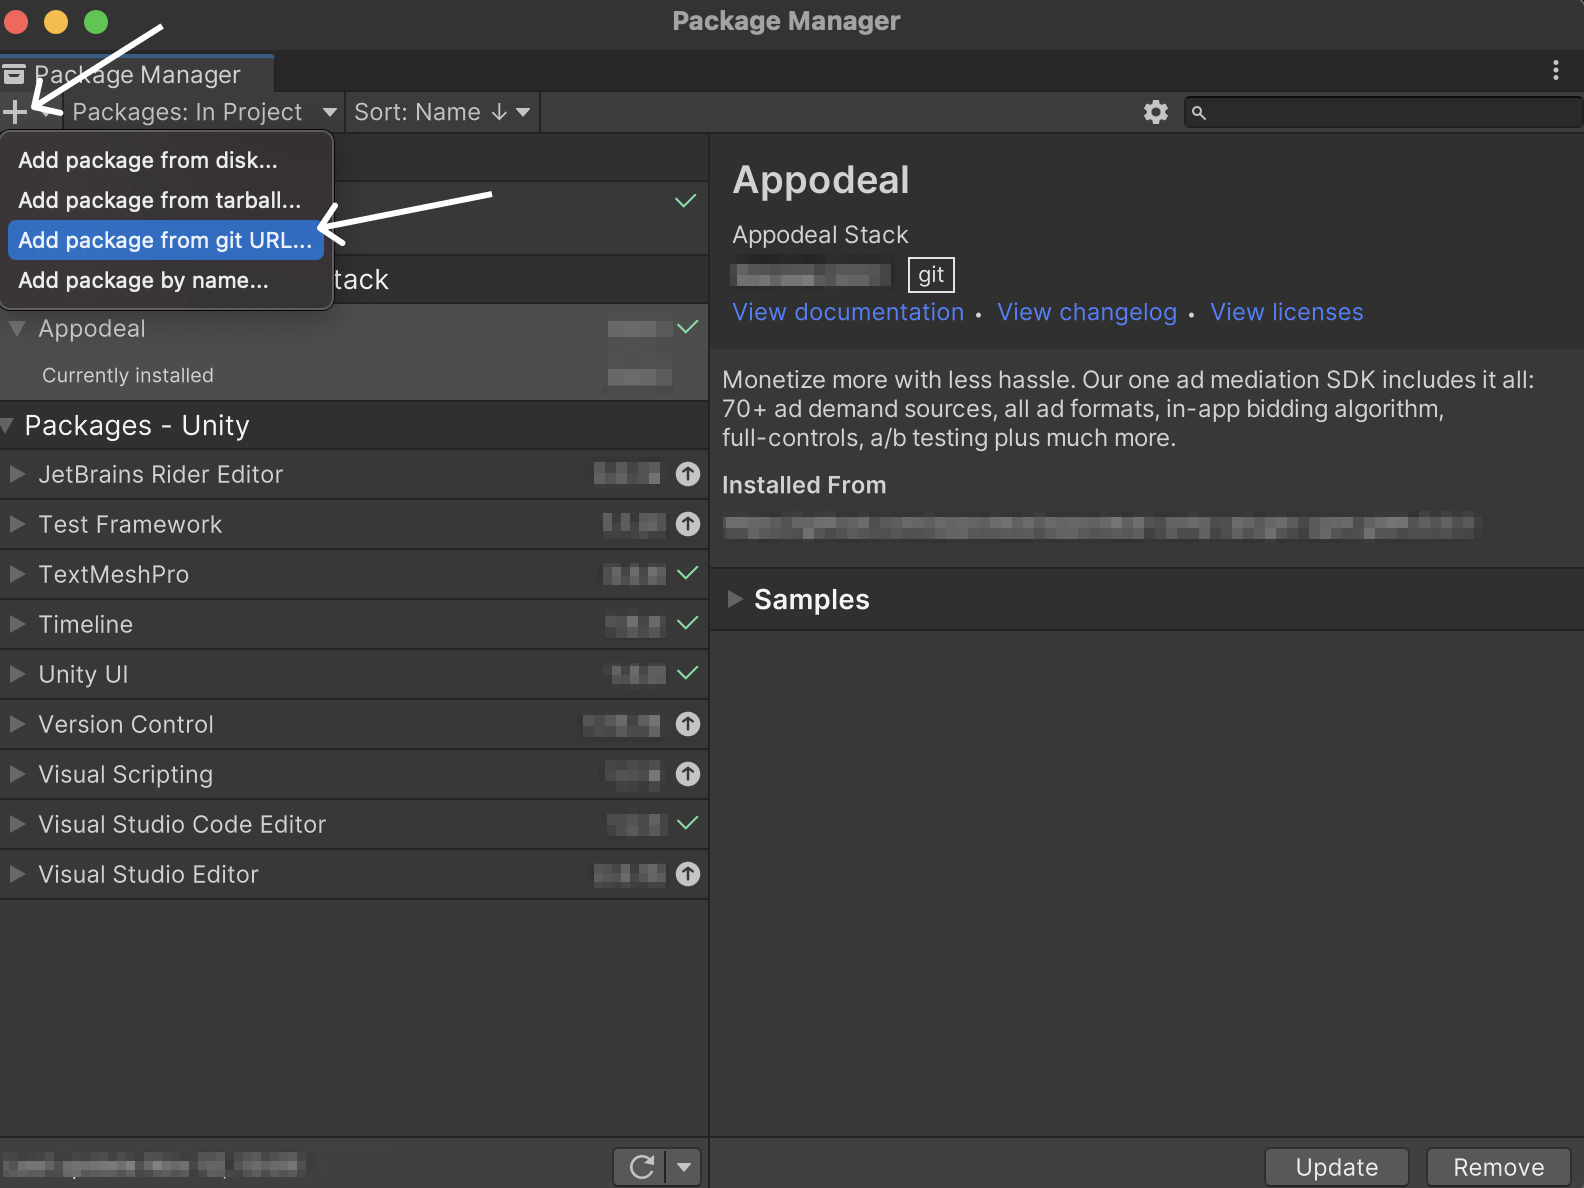
Copy the link below, head to the Window → Package Manager → "+" → Add package from git URL, paste the copied link there and press enter.
https://github.com/appodeal/appodeal-unity-plugin-upm.git#v4.3.0
- Download Appodeal Unity Plugin, which includes the newest Android and iOS Appodeal SDKs with major improvements, by clicking on the button below.
Unity Plugin v4.3.0
- To import Appodeal Unity Plugin, double-click on the Appodeal-Unity-Plugin-4.3.0-15.07.2026.unitypackage file, or go to the Assets → Import Package → Custom Package. Keep all the files in the Importing Package window selected, and click Import.
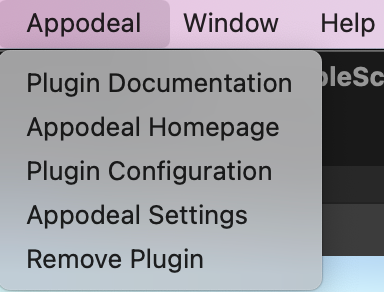
Use Appodeal Plugin Manager to update to the latest Appodeal SDK from the Unity menu bar (Appodeal → Plugin Configuration), which supports Unity 2018.3 or higher. You can find more information in our blog.
Step 2. Configure Project
- Appodeal SDK Full Package
- Appodeal SDK Mediation Only
In case you would rather use the Appodeal SDK Full Package along with its services, please ensure you have not excluded them in your project (Appodeal → Plugin Configuration).
Please read our Appodeal Plugin Manager guide for more detailed information.
In case you are using Appodeal SDK Mediation Only, ensure you have excluded the "full package services" in your project (Appodeal → Plugin Configuration).
Please read our Appodeal Plugin Manager guide to learn how to exclude services.
Android Configuration
Gradle Settings
Android 11 changes how apps can query and interact with other apps that the user has installed on a device. For that reason make sure you're using Gradle version that matches one of listed here.
- Unity v2019.3 - v2019.4
- Unity v2020.1 - v2022.1
- Unity v2022.2 (up to v2022.3.37f1)
- Unity v2021.3.41f1+, v2022.3.38f1+
- Unity v6000.0.23f1+
- Go to Preferences → External Tools and update your gradle version to 6.7.1.
- Go to Player Settings → Publishing Settings and enable Custom Base Gradle Template flag.
- Go to Assets → Plugins → Android → baseProjectTemplate.gradle, open the file and change
classpath 'com.android.tools.build:gradle:3.4.0'toclasspath 'com.android.tools.build:gradle:4.2.0'.
- Go to Preferences → External Tools and update your gradle version to 6.7.1.
- Go to Player Settings → Publishing Settings and enable Custom Base Gradle Template flag.
- Go to Assets → Plugins → Android → baseProjectTemplate.gradle, open the file and change
classpath 'com.android.tools.build:gradle:3.6.0'toclasspath 'com.android.tools.build:gradle:4.2.0'.
- Go to Preferences → External Tools and update your gradle version to 7.6.
- Go to Player Settings → Publishing Settings and enable Custom Base Gradle Template flag.
- Go to Assets → Plugins → Android → baseProjectTemplate.gradle, open the file and change
'com.android.application' version '7.4.2', 'com.android.library' version '7.4.2'to'com.android.application' version '7.3.1', 'com.android.library' version '7.3.1'.
- Go to Preferences → External Tools and update your gradle version to 8.4.
- Go to Player Settings → Publishing Settings and enable Custom Base Gradle Template flag.
- Go to Assets → Plugins → Android → baseProjectTemplate.gradle, open the file and change
'com.android.application' version '8.3.0', 'com.android.library' version '8.3.0'to'com.android.application' version '8.2.2', 'com.android.library' version '8.2.2'.
External Dependency Manager
Appodeal Unity Plugin uses External Dependency Manager package. You need to complete the following steps to resolve Appodeal's dependencies:
-
Before switching to Android platform, select File → Build Settings → Android in Unity menu bar.
-
Add flag Custom Gradle Template for Unity 2017.4 - Unity 2019.2 versions or for Unity 2019.3 and higher activate the following toggles under Build Settings → Player Settings → Publishing settings:
- Custom Main Gradle Template
- Custom Gradle Properties Template
- Custom Gradle Settings Template
-
Enable the Patch mainTemplate.gradle option (Assets → External Dependency Manager → Android Resolver → Settings).
-
Enable the Copy and patch settingsTemplate.gradle from 2022.2 option (Assets → External Dependency Manager → Android Resolver → Settings).
-
Enable the Use Jetifier option (Assets → External Dependency Manager → Android Resolver → Settings).
-
Then run Assets → External Dependency Manager → Android Resolver and press Resolve or Force Resolve.
As a result, the modules, that are required for Appodeal SDK work, will be imported to project's mainTemplate.gradle file.
Configure AndroidManifest.xml
Before making changes to the AndroidManifest.xml file, make sure to remove the first line which is:
<!-- GENERATED BY UNITY. REMOVE THIS COMMENT TO PREVENT OVERWRITING WHEN EXPORTING AGAIN-->
We distinguish 2 sets of permissions: required permissions, that are obligatory for the correct work of Appodeal SDK, and optional permissions, that can be used for better targeting. For more information about the purpose of each of the permissions, see this FAQ section.
- These are the required permissions
<uses-permission android:name="android.permission.ACCESS_NETWORK_STATE" />
<uses-permission android:name="android.permission.INTERNET" />
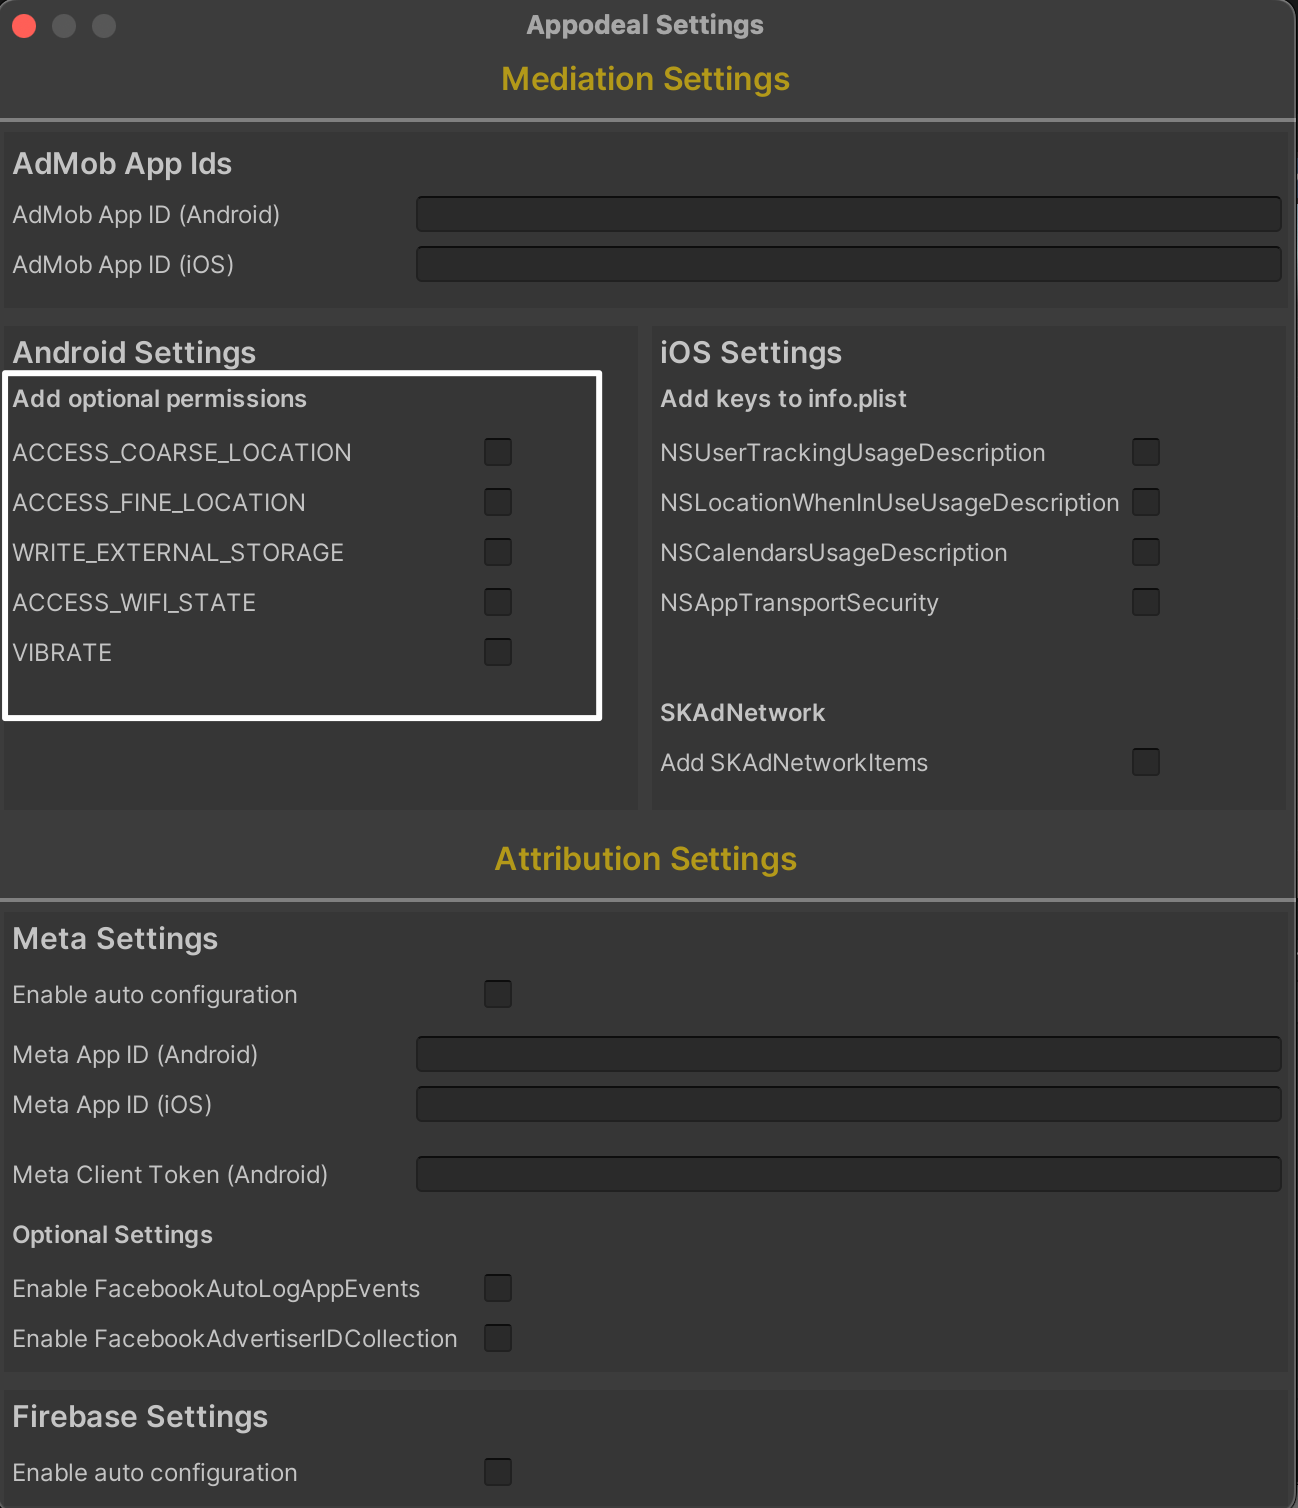
- These are the optional permissions
<uses-permission android:name="android.permission.ACCESS_COARSE_LOCATION" />
<uses-permission android:name="android.permission.ACCESS_FINE_LOCATION" />
<uses-permission android:name="android.permission.WRITE_EXTERNAL_STORAGE" />
<uses-permission android:name="android.permission.ACCESS_WIFI_STATE" />
<uses-permission android:name="android.permission.VIBRATE" />
Required permissions are already added to the project by Appodeal Unity Plugin. If you want to use any of the optional permissions, add them by following one of the methods listed below.
- Manual
- Auto
Go to Plugins → Android folder, open AndroidManifest.xml file and add there permissions you want.
Open Appodeal → Appodeal Settings window in Unity top bar menu. Tick all the optional permissions you want.
Some networks and 3rd party dependencies (related to network dependencies) can include their own permissions to the manifest. If you want to force remove such permissions you can refer to this guide.
According to Google policy, location permissions may only be requested to provide features beneficial to the user and relevant to the core functionality of the app. You cannot request access to location data for the sole purpose of advertising or analytics.
If you are not using location for the main functions of your app
- Remove location permission in your app by adding the following code under the
<manifest>tag in AndroidManifest.xml file located at the Assets/Plugins/Android directory.
<manifest xmlns:android="http://schemas.android.com/apk/res/android" package="com.unity3d.player" xmlns:tools="http://schemas.android.com/tools">
<uses-permission android:name="android.permission.ACCESS_COARSE_LOCATION"
	tools:node="remove" />
<uses-permission android:name="android.permission.ACCESS_FINE_LOCATION"
	tools:node="remove" />
</manifest>
- Update the app on Google Play. During the publishing process, make sure there are no location warnings in Google Play Console.
If you are using location for the main functions of your app
-
Fill out the Location permissions declaration form in Google Play Console. You can read more about the declaration form here.
-
Update the app on Google Play. During the publishing process, make sure there are no location warnings in Google Play Console.
Multidex Support
-
If you are using Unity v2019.2 and versions below you need to add Multidex support to your project. Follow this guide to add Multidex.
-
If you are using Unity v2019.3 or higher go to Player Settings → Publishing Settings → Other Settings and change Minimum API Level to 21 or higher.
Make sure to add Privacy Policy to your app on Google Play that links to Appodeal's Privacy Policy to avoid violating Google Play Developer Distribution Agreement.
iOS Configuration
External Dependency Manager
- Turn off Link frameworks statically option in EDM (Assets → External Dependency Manager → iOS Resolver → Settings → Link frameworks statically).
Add SKAdNetworkIds
To ensure SKAdNetwork packages can be correctly scanned, follow the Semantic Versioning (SemVer) format for your app version.
Ad networks used in Appodeal mediation support conversion tracking using Apple's
SKAdNetwork, which means ad networks are able
to attribute an app install even when IDFA is unavailable. To enable this functionality, you will need to update
the SKAdNetworkItems key with an additional dictionary in your
Info.plist.
- Manual
- Auto
- Select Info.plist in the Project navigator in Xcode
- Right-click on Info.plist file → Open as → Source Code
- Copy the SKAdNetworkItems from below and paste it into your Info.plist file
There is SKAdNetworks IDs in Info.plist format
<key>SKAdNetworkItems</key>
<array>

</array>
Open Appodeal → Appodeal Settings window in Unity top bar menu. Tick the corresponding checkbox.

Configure App Transport Security Settings
In order to serve ads, the SDK requires you to allow arbitrary loads. Set up NSAppTransportSecurity key to allow arbitrary loads following the steps:
- Manual
- Auto
- Go to your info.plist file, then press
Add+anywhere in the first column of the key list. - Add
App Transport Security Setting keyand set its type toDictionaryin the second column. - Press
Add+at the end of the nameApp Transport Security Settings keyand chooseAllow Arbitrary loadsoption. Set its type toBooleanand its value toYes.
You can also add the key to your Info.plist directly, using this code:
<key>NSAppTransportSecurity</key>
<dict>
  <key>NSAllowsArbitraryLoads</key>
  <true/>
</dict>
Open Appodeal → Appodeal Settings window in Unity top bar menu. Tick the corresponding checkbox.
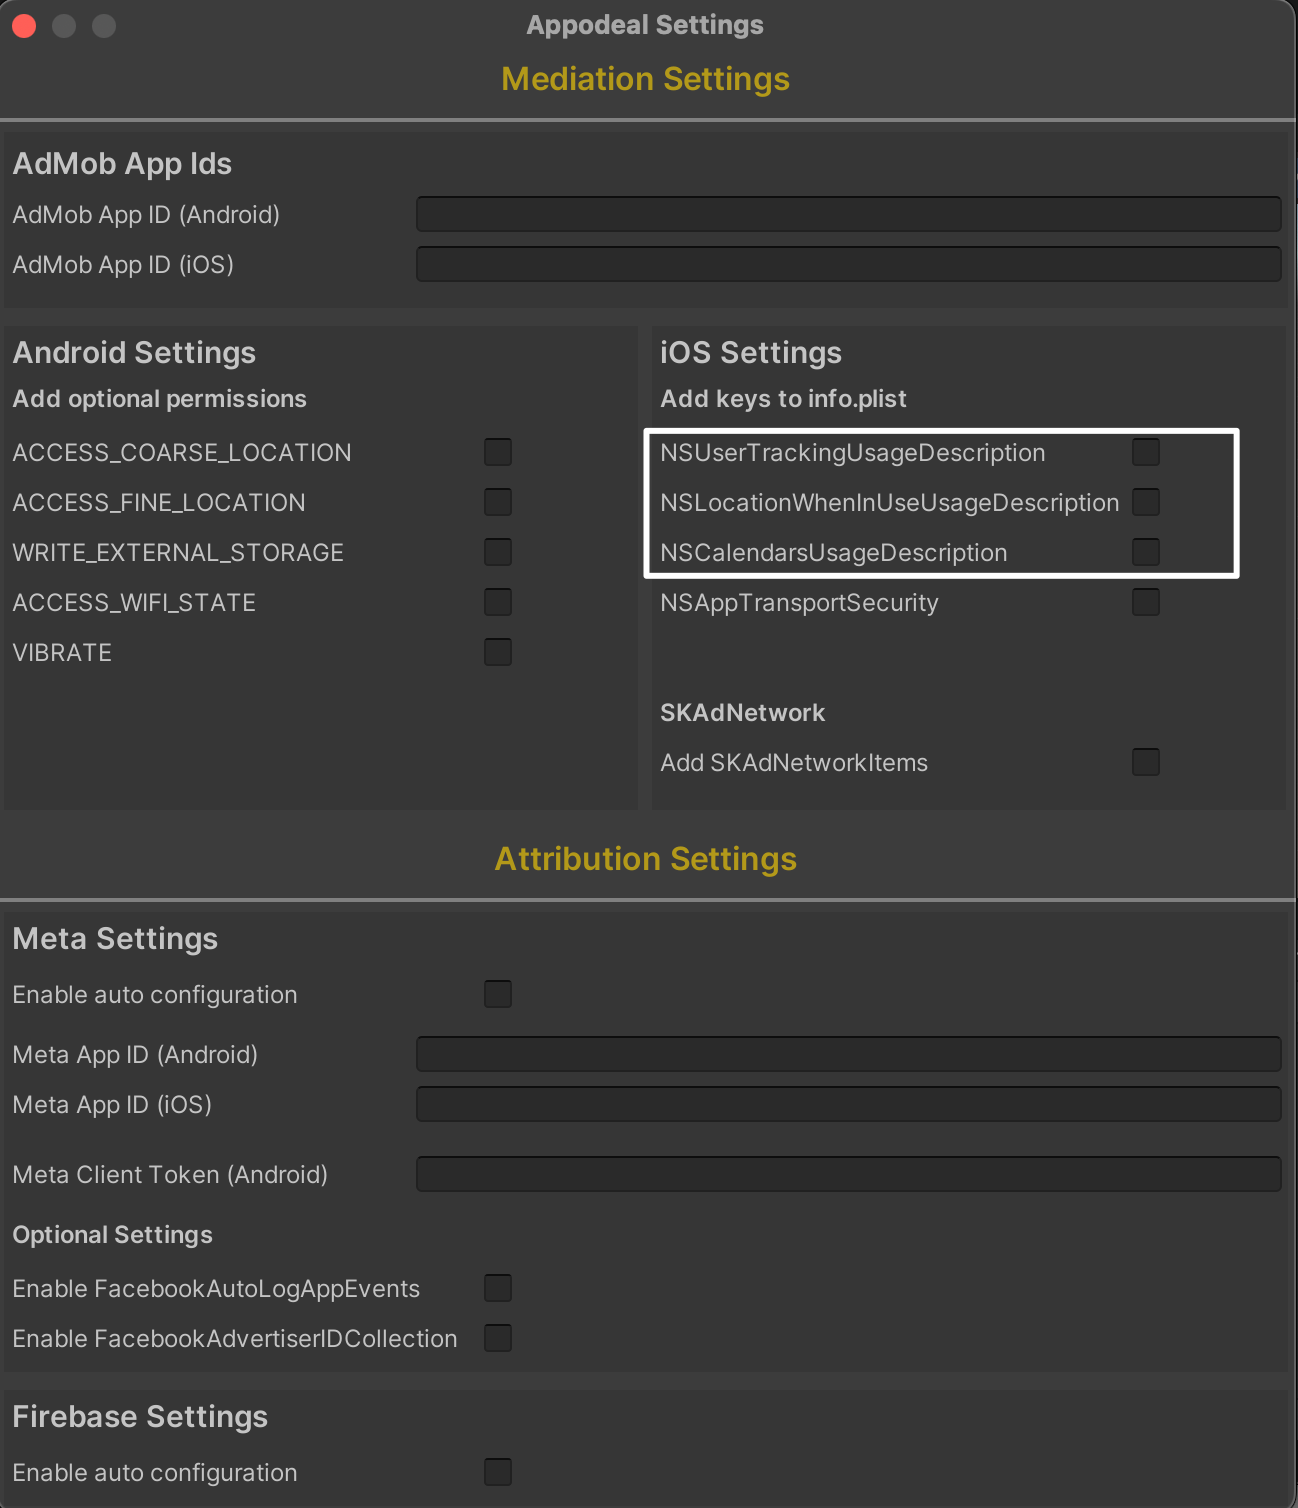
Other Feature Usage Descriptions
To improve ad performance the the following entries may be added:
- NSUserTrackingUsageDescription - As of iOS 14 using IDFA requires permission from the user. The following entry must be added in order to improve ad performance.
- NSLocationWhenInUseUsageDescription - Entry is required if your application allows Appodeal SDK to use location data.
- NSCalendarsUsageDescription - Recommended by some ad networks.
- Manual
- Auto
Add any of the keys to your Info.plist file, using this template:
<key>NSUserTrackingUsageDescription</key>
<string>$(APP_NAME) needs your advertising identifier to provide personalised advertising experience tailored to you</string>
<key>NSLocationWhenInUseUsageDescription</key>
<string>$(APP_NAME) needs your location for analytics and advertising purposes</string>
<key>NSCalendarsUsageDescription</key>
<string>$(APP_NAME) needs your calendar to provide personalised advertising experience tailored to you</string>
Open Appodeal → Appodeal Settings window in Unity top bar menu. Tick the corresponding checkbox.
Known Issues
1. Empty CFBundleVersion Issue
As a result of this error found in Xcode 14 and persisting in Xcode 15,
the values for Build and Version may appear blank within your .xcworkspace file under
the navigation path Target → General → Identity.
If you are not able to upload your app to the App Store due to
Connect Operation Error CFBundleShortVersionString is empty but must be composed of one to three period-separated integers
error, or do not get ads in your app after completing the above integration steps of Appodeal SDK make sure that you have the
package version in your generated Xcode project.
Navigate to the .xcworkspace file → Target → General → Identity → and add your app version if it is empty.
2. AdColony Presentation Issue
AdColony always checks, if the key window’s rootViewController matches the passed rootViewController.
Otherwise, Adcolony fails to present the ad. If your app has multiple independent windows,
you can get a message with this or similar text:
AdColony [*** ERROR ***] : AdColony has ads, but could not display them. AdColony was unable to find
the currently visible UIViewController for your app. Please ensure that your key UIWindow has a rootViewController.
It means, that the rootViewController that was used in showAd, doesn't belong to the first window in the array.
AdMob Configuration
AdMob App ID is the unique ID assigned to your app.
To find the AdMob App ID in your AdMob account, go to Apps → your application → app settings and copy the AdMob App ID.
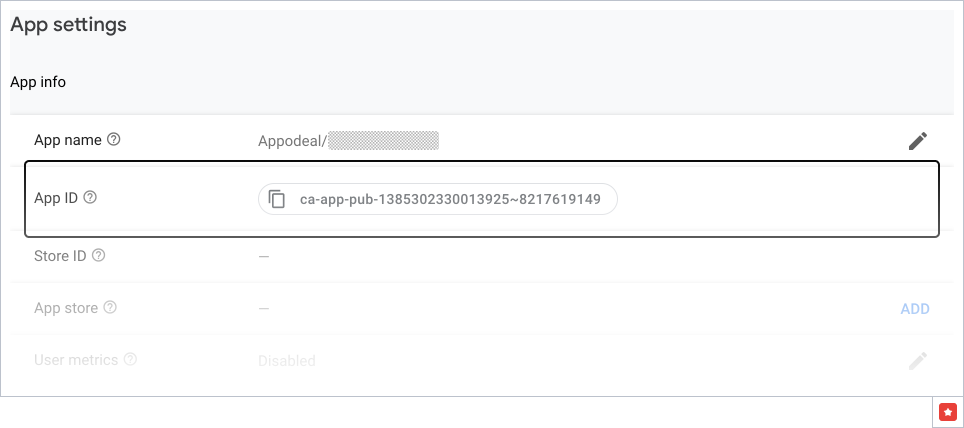
Add AdMob App Ids from the Unity Menu bar Appodeal → Appodeal Settings tool for each platform.
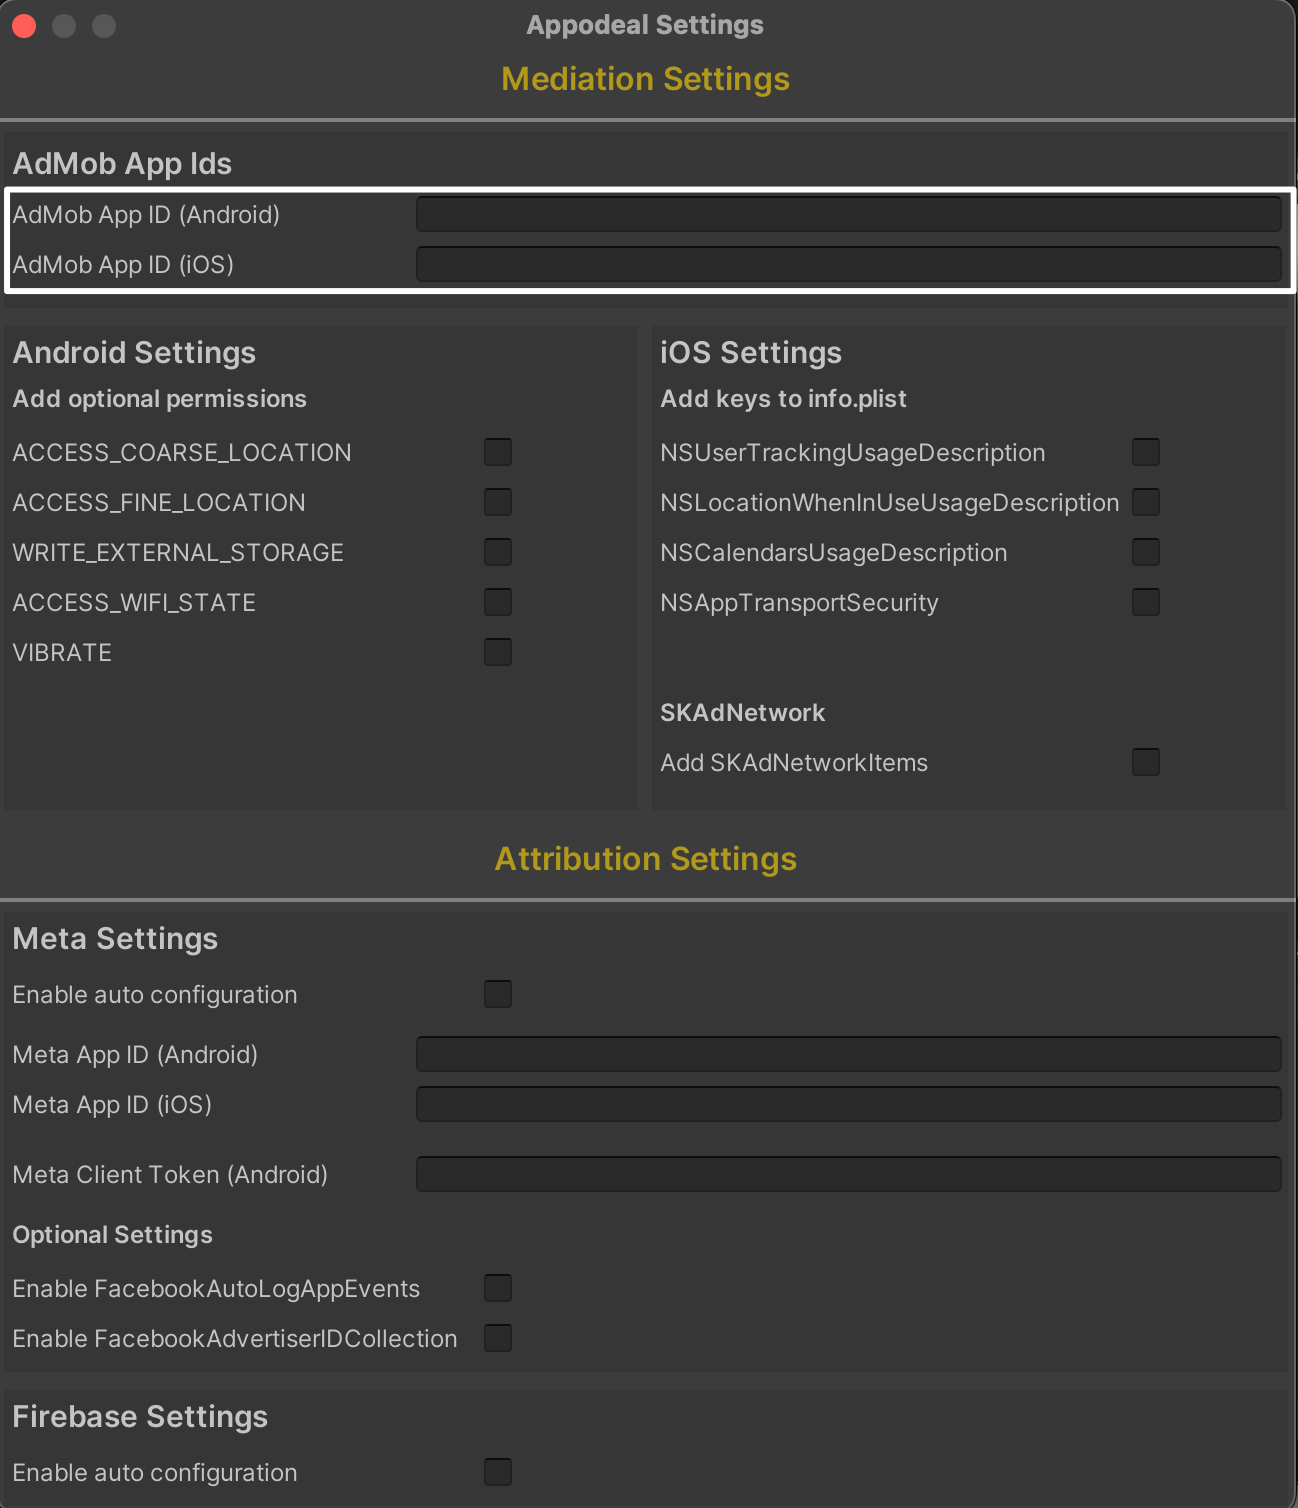
For more information about Admob sync check out our Admob connection guide.
Step 3. Initialize SDK
Before loading and displaying ads, you need to initialize Appodeal SDK, as follows:
- Import Namespaces
- UPM Distribution
- Manual Distribution
using AppodealStack.Monetization.Api;
using AppodealStack.Monetization.Common;
using AppodealAds.Unity.Api;
using AppodealAds.Unity.Common;
- Call Initialization Method
Add the following code snippet to Start() (or whatever you want) method of your main scene’s MonoBehaviour
- UPM Distribution
- Manual Distribution
class Test : MonoBehaviour
{
    private void Start()
    {
        int adTypes = AppodealAdType.Interstitial | AppodealAdType.Banner | AppodealAdType.RewardedVideo | AppodealAdType.Mrec;
        string appKey = "YOUR_APPODEAL_APP_KEY";
        AppodealCallbacks.Sdk.OnInitialized += OnInitializationFinished;
        Appodeal.Initialize(appKey, adTypes);
    }

    public void OnInitializationFinished(object sender, SdkInitializedEventArgs e) {}
}
YOUR_APPODEAL_APP_KEY with the actual app key.Use the type codes below to set the preferred ad format:
AppodealAdType.Interstitialfor interstitial.AppodealAdType.RewardedVideofor rewarded videos.AppodealAdType.Bannerfor banners.AppodealAdType.Mrecfor 300*250 banners.
Ad types can be combined using | operator. For example, AppodealAdType.Interstitial | AppodealAdType.RewardedVideo.
Initialize only those ad types you want to use in your app to avoid getting ad requests to unused ones.
class Test : MonoBehaviour, IAppodealInitializationListener
{
    private void Start()
    {
        int adTypes = Appodeal.INTERSTITIAL | Appodeal.BANNER | Appodeal.REWARDED_VIDEO | Appodeal.MREC;
        string appKey = "YOUR_APPODEAL_APP_KEY";
        Appodeal.initialize(appKey, adTypes, this);
    }

    public void onInitializationFinished(List<string> errors) {}
}
YOUR_APPODEAL_APP_KEY with the actual app key.Use the type codes below to set the preferred ad format:
Appodeal.INTERSTITIALfor interstitial.Appodeal.REWARDED_VIDEOfor rewarded videos.Appodeal.BANNERfor banners.Appodeal.MRECfor 300*250 banners.
Ad types can be combined using | operator. For example, Appodeal.INTERSTITIAL | Appodeal.REWARDED_VIDEO.
Initialize only those ad types you want to use in your app to avoid getting ad requests to unused ones.
You can find detailed documentation here